I’m totally obsessed with bow nail designs! They’re like little presents tied onto your nails, adding charm and sass to every look. From preppy nails with bows to the chic French with bow nails, there’s a bow style for every vibe.
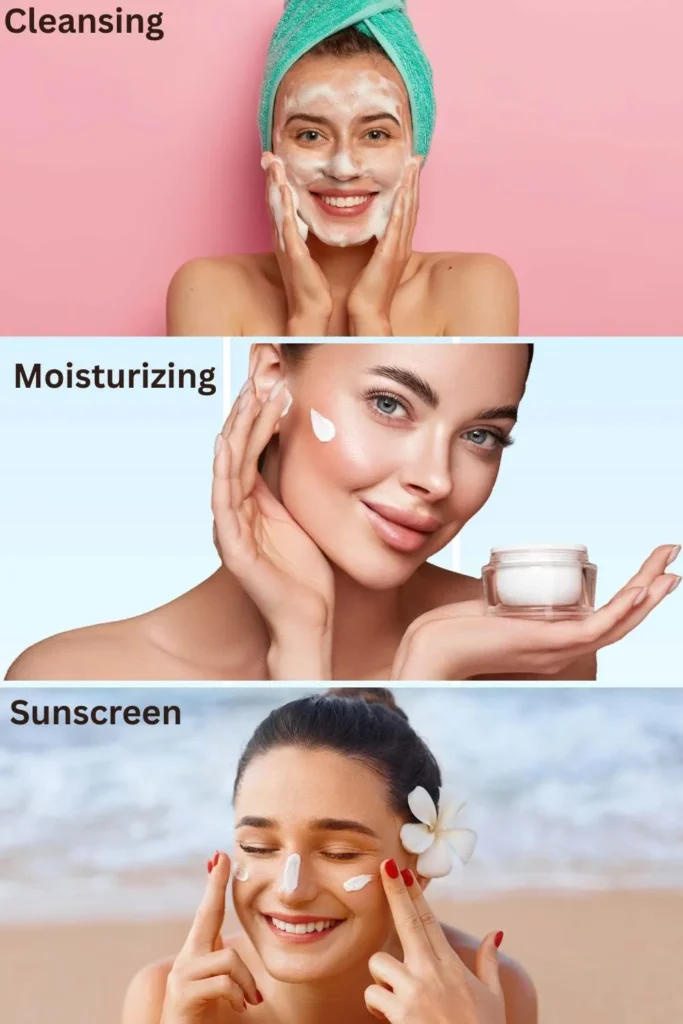
Whether you’re into nail inspo with bow or swooning over French tips with bows and pearls, these designs are Pinterest perfection. Below, I’ve broken down all 30 bow nails ideas individually, each with its own unique flair, plus a nail care routine to keep those nail polish bow designs looking flawless!
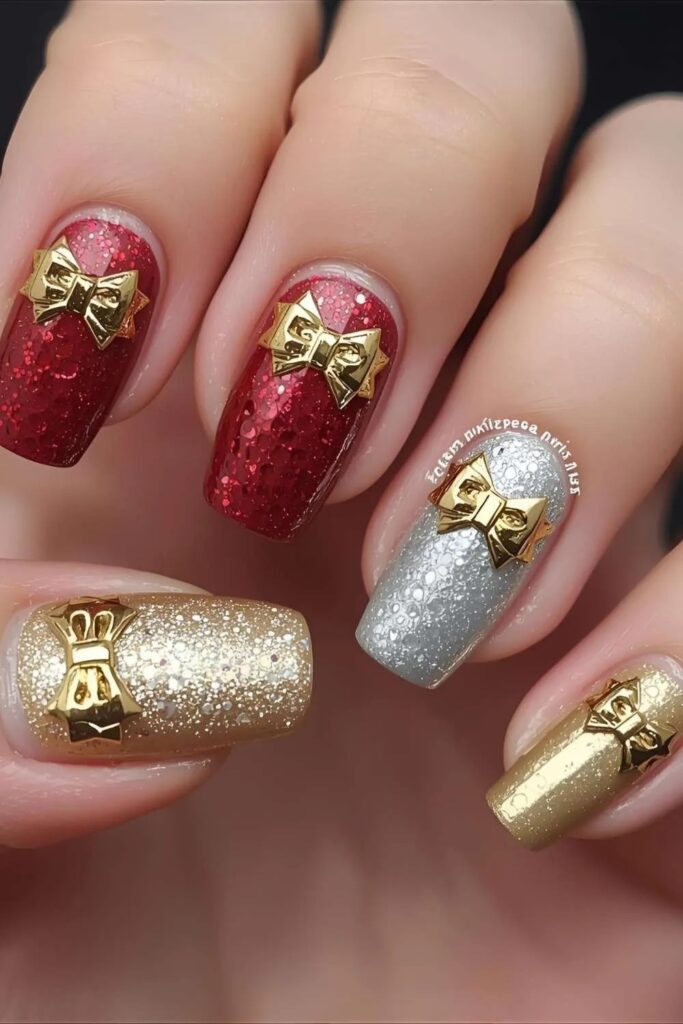
1. Classic Red Bow Nails
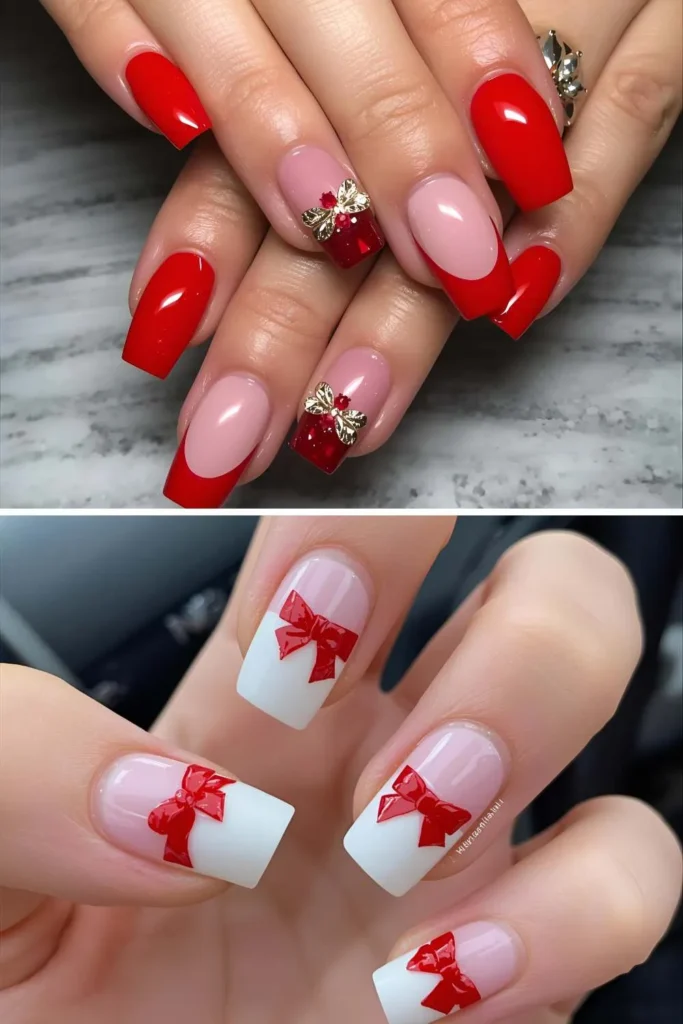
If nails had a “little red dress,” this would be it. Classic red bow nails are bold, timeless, and so Pinterest-perfect for both everyday glam and holiday vibes. Think glossy scarlet polish topped with a delicate bow accent—it’s basically confidence on your fingertips.
Red bows especially shine around Christmas and Valentine’s when everyone’s in the mood for romance and sparkle.
Products you’ll need:
- Glossy red nail polish
- Thin detail brush
- Nail bow stickers or 3D bow charms
Nail Care Tips:
- Always use a base coat with red polish to avoid staining.
- Seal bows with a strong top coat for longer wear.
- Keep cuticles hydrated so your bold red doesn’t look messy.
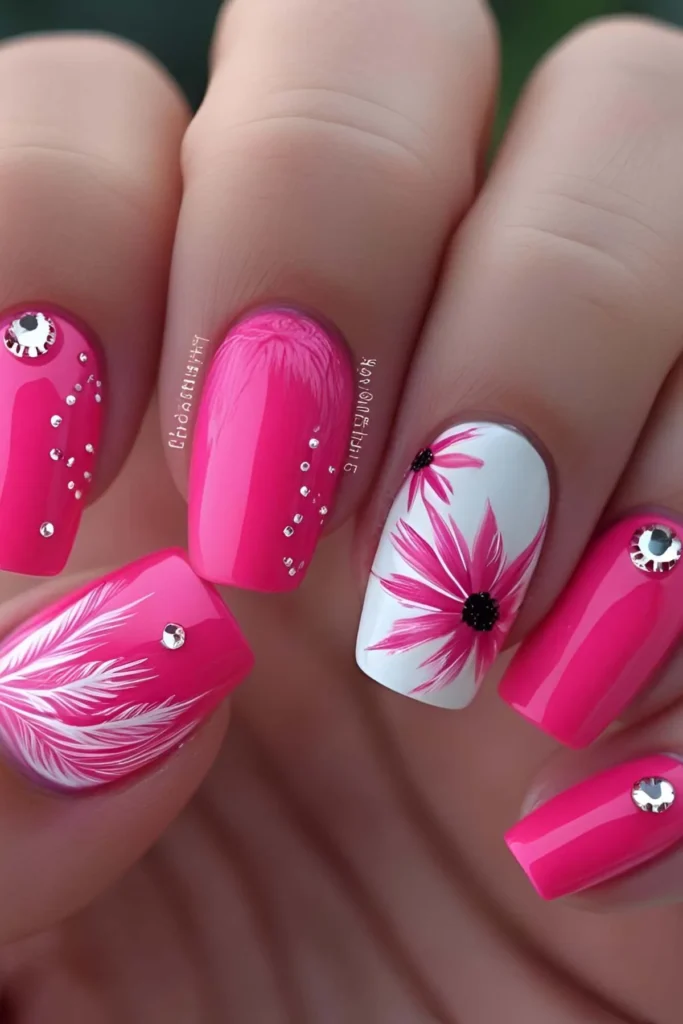
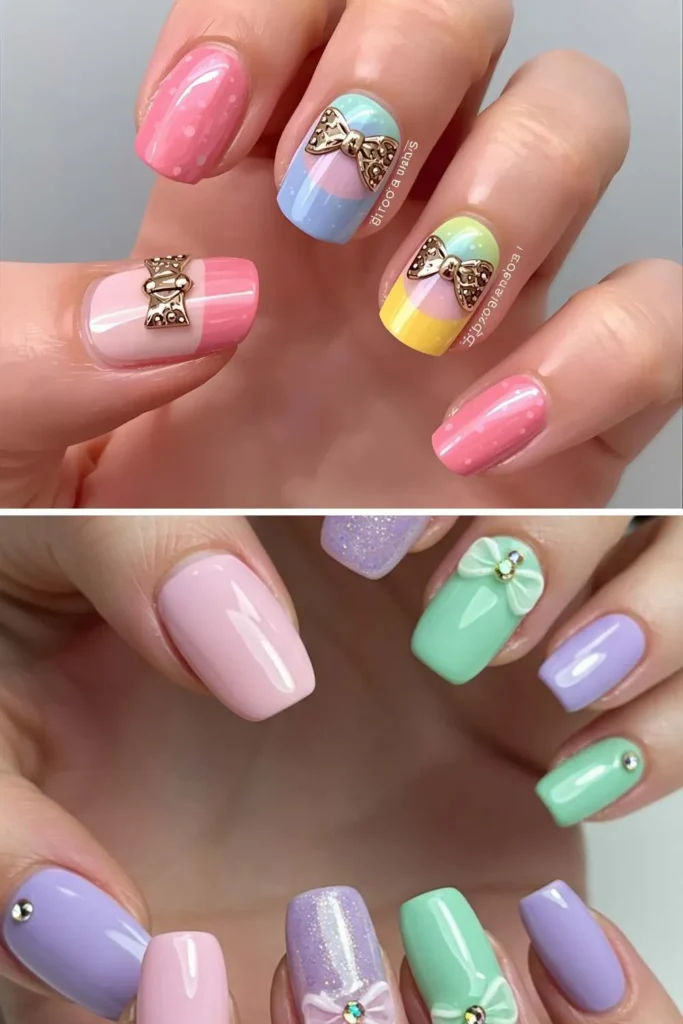
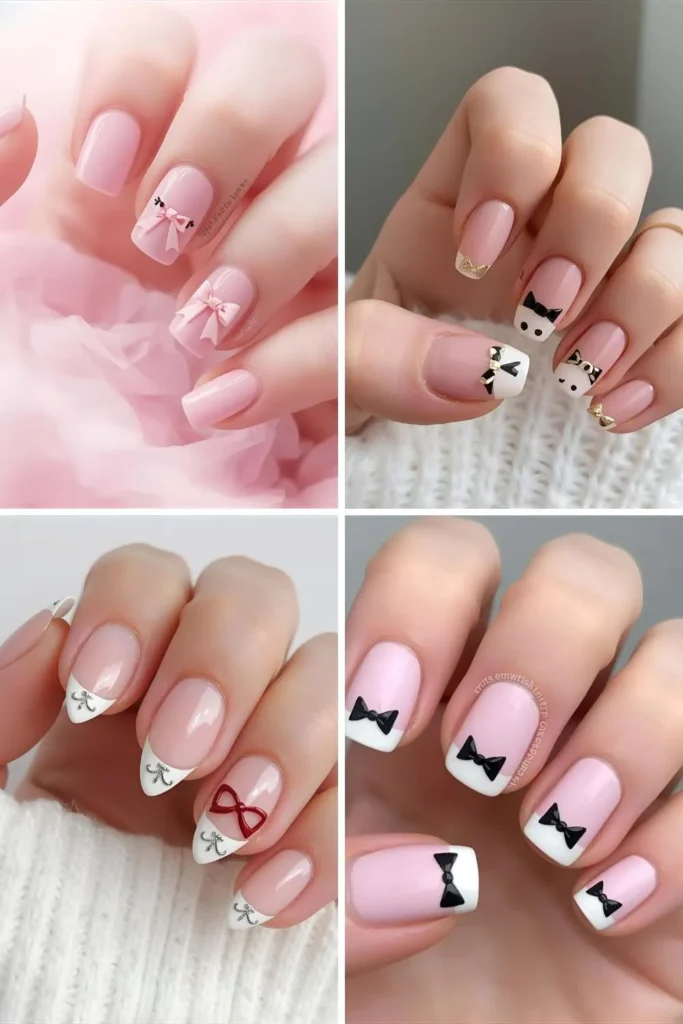
2. Pink Coquette Bow Nails
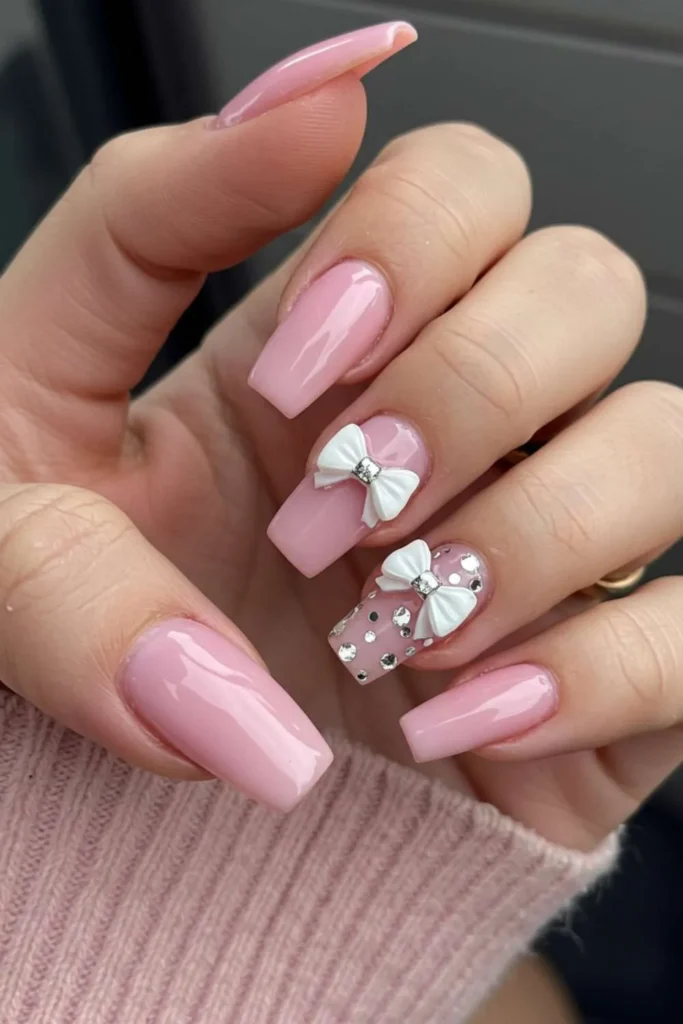
Soft pink nails + delicate bows = the ultimate coquette aesthetic. Pinterest is obsessed with these right now because they fit perfectly into balletcore and girly trends.
You can go pastel pink for a soft vibe or hot pink if you’re feeling bold. Add a white or silver bow detail, and suddenly your nails look like they belong in a rom-com montage.
Products you’ll need:
- Baby pink nail polish
- White nail art pen
- Pearl or rhinestone bow stickers
Nail Care Tips:
- Use a ridge-filling base coat for a smooth pastel look.
- Apply thin layers of polish to avoid streaking.
- Store rhinestones in a sealed case so they don’t lose shine.
3. White French Tip Bow Nails
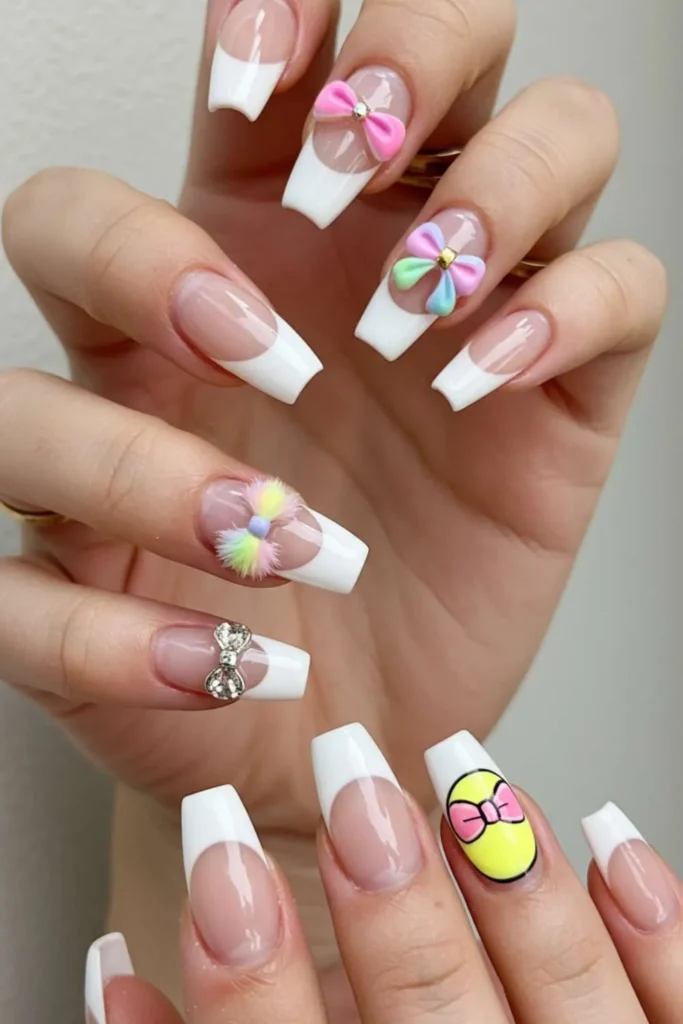
French tips are already a classic, but when you add bows? Oh honey, we’ve just entered “Pinterest queen” territory.
A tiny bow at the cuticle or corner of your French tip instantly makes it playful while keeping it chic. Perfect for weddings, parties, or just when you want to feel fancy sipping iced coffee.
Products you’ll need:
- White nail polish for tips
- Nude or sheer base polish
- Bow decals (mini size)
Nail Care Tips:
- Use nail guides for perfectly crisp French tips.
- Choose shorter bows for elegance over bulkiness.
- Apply a gel top coat for a long-lasting salon finish.
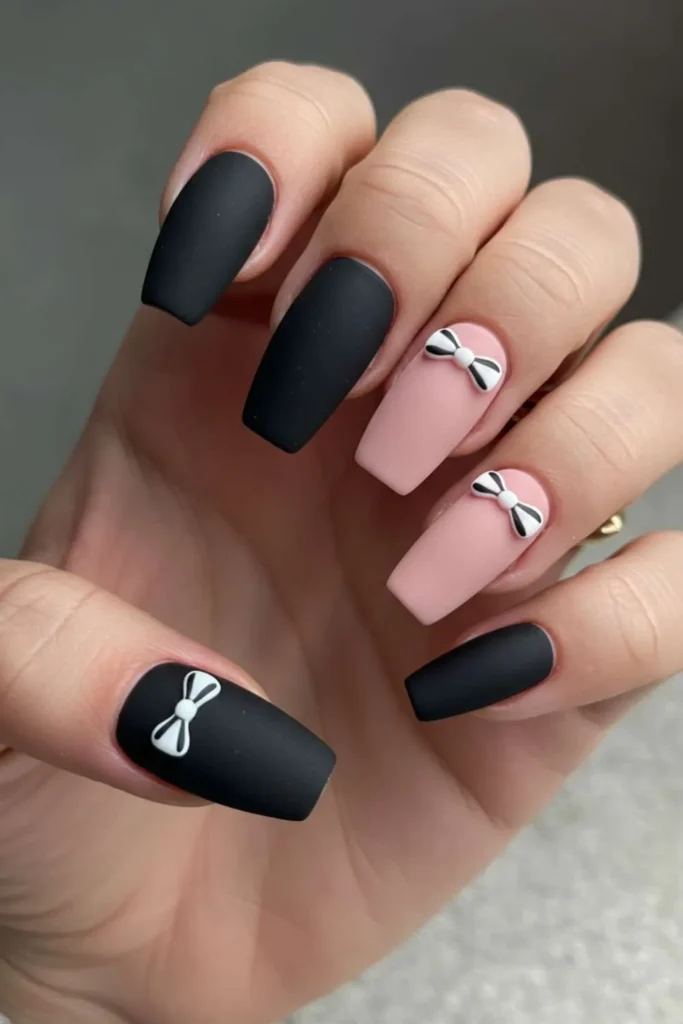
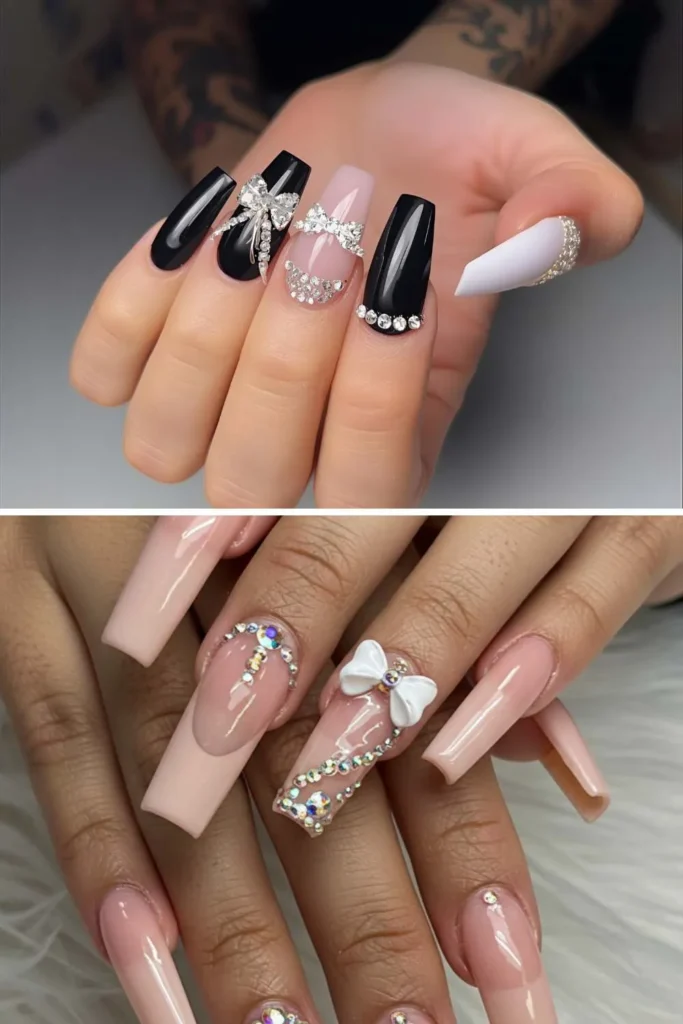
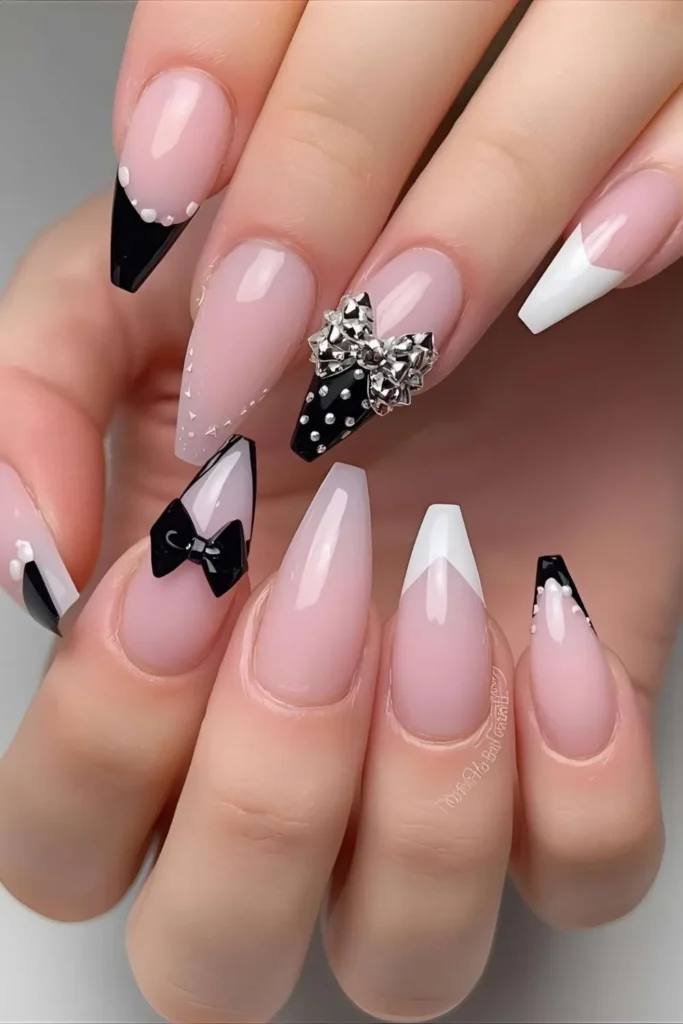
4. Black Bow Accent Nails
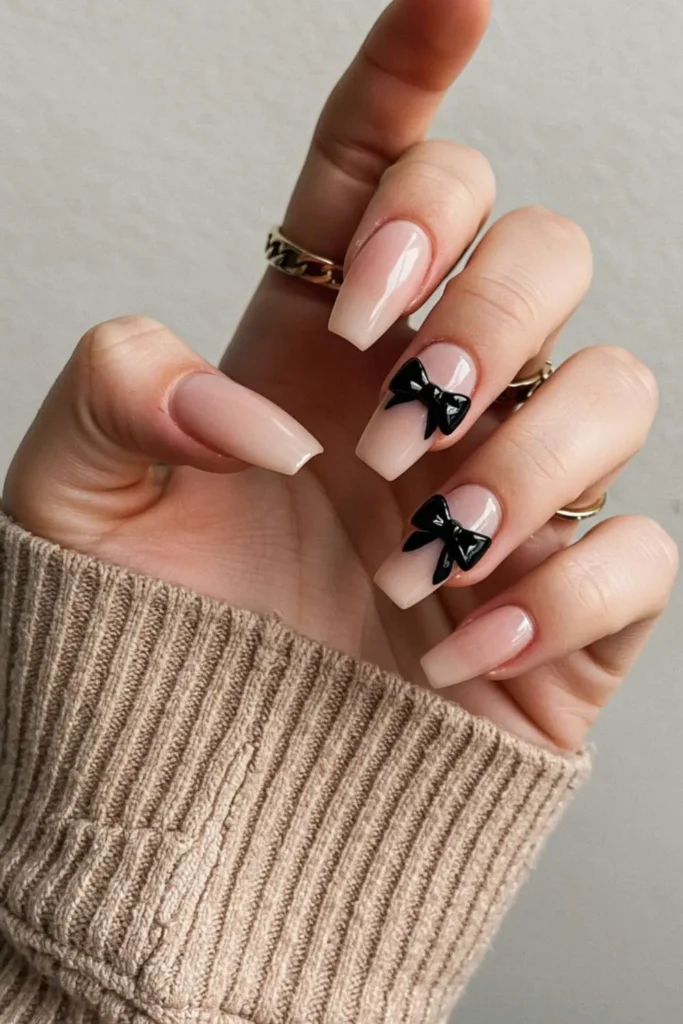
Black bow nails are edgy yet surprisingly chic. Imagine a glossy nude or matte base with one bold black bow—it’s giving classy but mysterious.
Perfect for anyone who wants a more fashion-forward take on bows without going overly girly. These look incredible on almond and coffin nail shapes.
Products you’ll need:
- Nude or matte beige polish
- Black gel polish
- Thin brush or pre-made bow stickers
Nail Care Tips:
- Don’t skip the base coat to protect natural nails from black polish stains.
- Use matte top coat if you want a modern, velvety look.
- Reapply top coat every few days to prevent chips.
5. Nude Nails with Tiny Bows
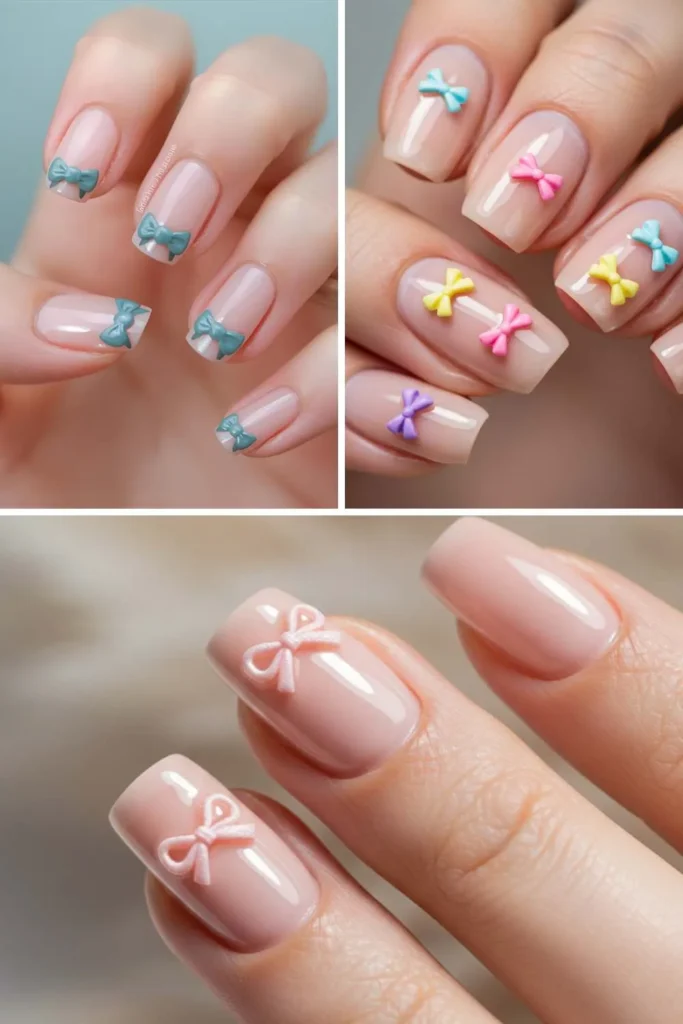
Nude nails with tiny bows are the perfect mix of subtle and stylish. The neutral base gives off a polished vibe, while the little bow accents add just the right amount of charm. This design is ideal if you love dainty, feminine details without going over the top.
Plus, nude shades make your fingers look longer and more elegant. It’s the kind of manicure that quietly says, “I’ve got great taste.”
Products you’ll need:
- Sheer nude polish
- Gold or white nail stickers
- Quick-dry top coat
Nail Care Tips:
- Keep nails buffed smooth for a clean nude finish.
- Stick to one bow per nail for minimal elegance.
- Add cuticle oil daily for a polished look.
6. Glitter Bow Nails
If you love sparkle, glitter bow nails are about to be your new obsession. A glittery base instantly makes your manicure party-ready, while cute bows soften the glam with a playful twist. You can go full-on glitter or just accent a few nails for balance.
These nails scream holiday vibes, but honestly, they’re gorgeous all year round. It’s like having your own personal disco ball on your fingertips.
Products you’ll need:
- Glitter polish (silver or gold)
- Small bow charms
- Gel top coat
Nail Care Tips:
- Layer glitter polish for an even sparkle.
- Use tweezers to place bows neatly.
- Don’t forget to double-seal with top coat to prevent snagging.
7. Matte Bow Nail Designs
Matte bow nails are chic, modern, and oh-so-trendy. The flat finish gives your manicure a stylish edge that’s different from traditional glossy looks. Add a bow, and suddenly you’ve got a combo that’s both edgy and feminine.
I love this style in darker shades like navy or burgundy because it feels elegant but unique. It’s perfect if you want a little sophistication mixed with a touch of fun.
Products you’ll need:
- Matte top coat
- Neutral polish shades (black, pink, beige)
- Bow decals or hand-painted bow art
Nail Care Tips:
- Apply matte top coat last to keep the effect fresh.
- Avoid oily cuticle creams right after matte polish—it can look shiny.
- Reapply matte coat mid-week to maintain texture.
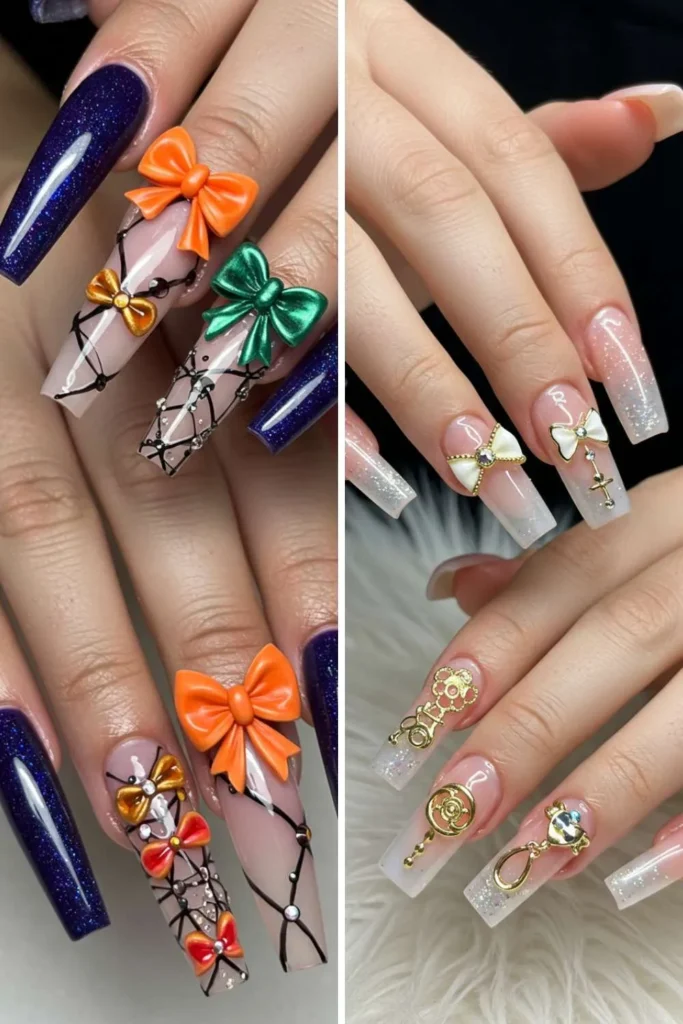
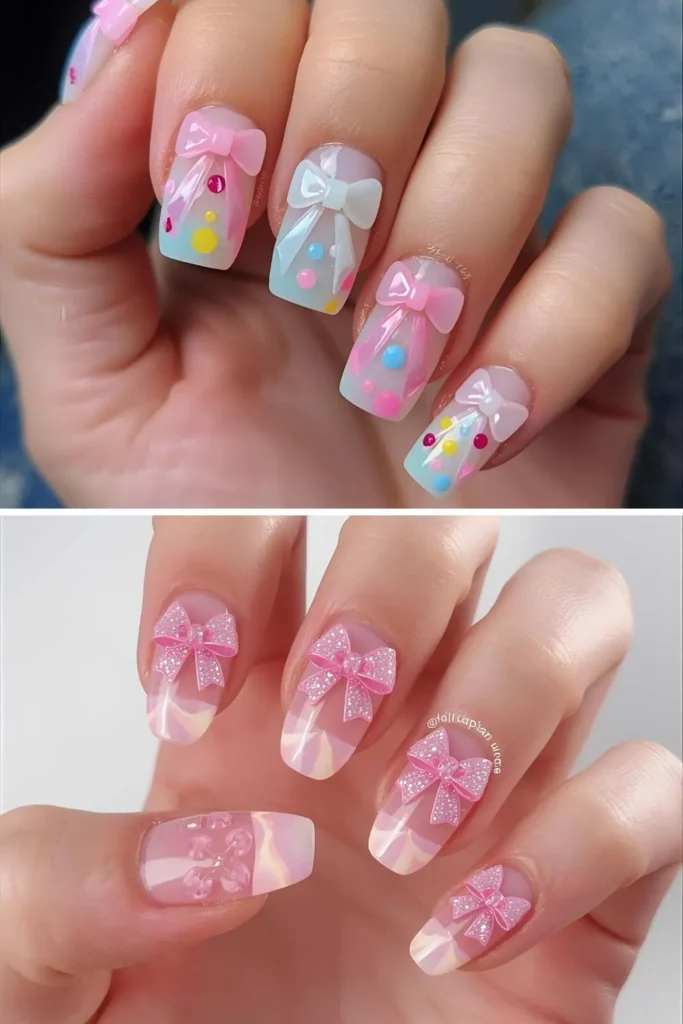
8. 3D Bow Nail Art
Why settle for flat designs when you can have bows that pop? 3D bow nail art takes your manicure from basic to wow in seconds. These raised embellishments make your nails look like mini works of art.
Sure, they’re not the most practical if you type a lot, but they’re worth it for the glam. This design is made for weddings, parties, or anytime you want your nails to be the star of the show.
Products you’ll need:
- Acrylic bow charms
- Nail glue
- Strong top coat
Nail Care Tips:
- Use nail glue designed for charms for extra hold.
- Stick to one or two statement bows per hand.
- Avoid rough activities (they can catch easily).
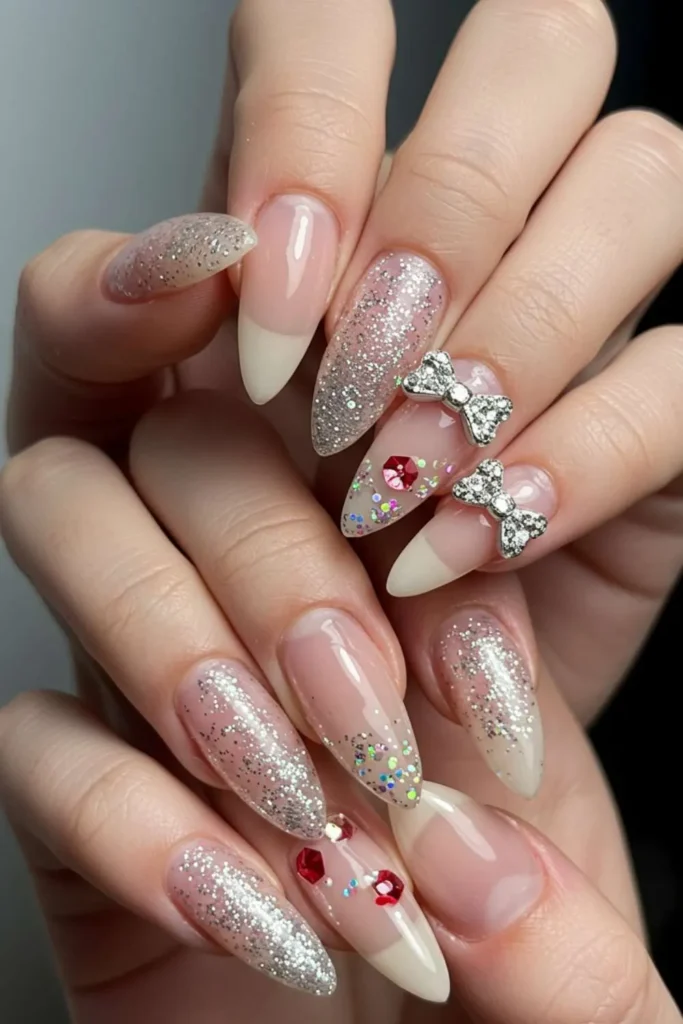
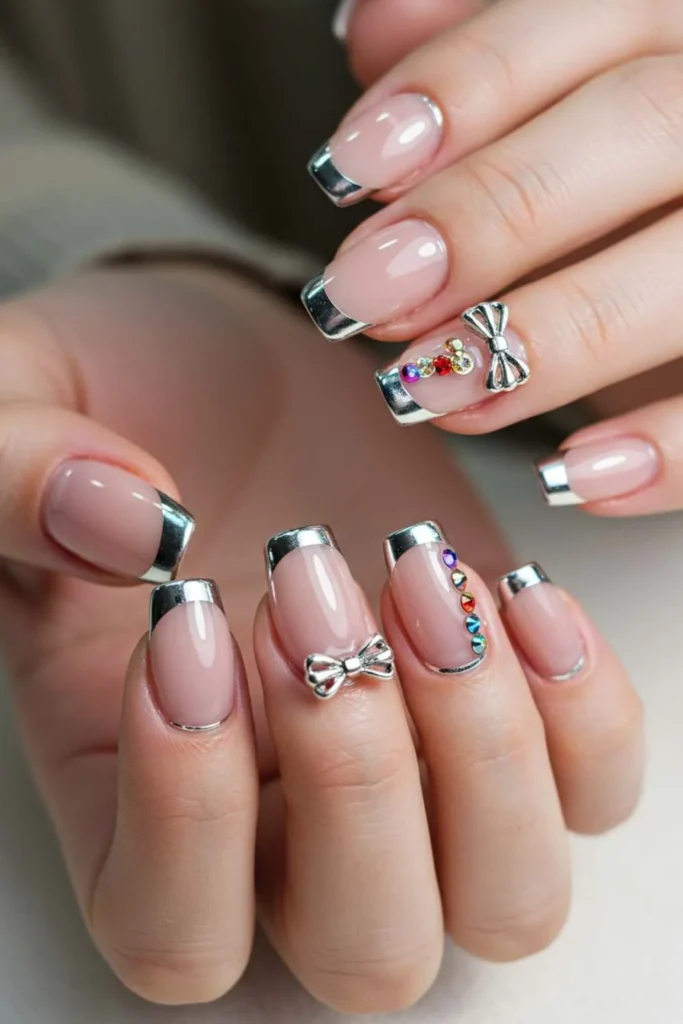
9. Rhinestone Bow Nails

Add a little bling to your bows, and you’ve got yourself rhinestone bow nails. The rhinestones catch the light beautifully, making your nails sparkle every time you move. They pair perfectly with neutral or pastel bases so the stones really shine.
I personally think they’re a great way to add a luxe feel without going overboard. If you love jewelry, this nail design is basically like accessorizing twice.
Products you’ll need:
- Rhinestone kit
- Nail glue
- Clear polish for sealing
Nail Care Tips:
- Use a wax pencil for easy rhinestone placement.
- Seal rhinestones with top coat to lock them in.
- Store your mani tools in a dry place to avoid rust.
10. Acrylic Bow Nails
Acrylic bow nails are the go-to if you love long, bold, and dramatic designs. The acrylic base gives you the perfect canvas to experiment with bows, rhinestones, and any other add-ons. Plus, they’re sturdy enough to hold 3D charms without breaking easily.
I love how creative you can get with acrylics—you can switch between glossy, matte, glitter, or even ombre bases. It’s like having endless nail inspo right at your fingertips.
Products you’ll need:
- Acrylic nail set
- Colored polishes
- Bow charms (various sizes)
Nail Care Tips:
- Always prep nails before applying acrylics to prevent lifting.
- Don’t overload with bows—balance is key.
- Moisturize cuticles daily since acrylics can be drying.
11. Short Bow Nail Ideas
Who says short nails can’t have fun? Short bow nails are proof that you don’t need length to rock a cute design. Tiny bows add just the right amount of detail without overwhelming the nail. They’re easy to maintain, practical for everyday life, and still super stylish.
This design works great for students or professionals who want pretty nails that won’t get in the way. Cute, simple, and functional—what’s not to love?
Products you’ll need:
- Soft pastel polish
- Small bow stickers
- Quick-dry glossy top coat
Nail Care Tips:
- Stick to tiny bows that won’t overpower shorter nails.
- Use sheer colors to make nails look longer.
- File into a round shape for a neat finish.
12. Long Coffin Bow Nails
Long coffin bow nails are bold, dramatic, and Pinterest-perfect. The coffin shape gives you tons of space to get creative with bows, rhinestones, and accents. This style is perfect if you want your nails to make a statement the second you walk in the room.
I love how bows look stretched across a longer nail—it’s glamorous without being too much. Definitely a show-stopper for parties, weddings, or just because you feel extra.
Products you’ll need:
- Coffin acrylics
- Gel polish in bold shades
- Large bow charms
Nail Care Tips:
- Balance dramatic bows with simpler base colors.
- Seal heavily with gel top coat for durability.
- Avoid sharp activities—coffin nails are prone to breaks.
13. Square Bow Nails
Square nails are classic, and when you add bows, they get an instant glow-up. The sharp edges balance out the soft, feminine vibe of the bows perfectly.
This design feels clean, minimal, but still trendy. You can keep it simple with nude polish or go bold with bright colors and big bows. It’s a style that looks professional but still has that fun, girly twist.
Think pastel shades with delicate bows placed neatly in the center.
Products you’ll need:
- Nail file for square edges
- Nude or pastel polish
- Bow nail decals
Nail Care Tips:
- File straight across for even squares.
- Use light colors to keep it soft.
- Add top coat every 3 days for chip prevention.
14. Almond Bow Nails
Almond bow nails are the ultimate mix of chic and cute. The almond shape naturally elongates your fingers, and bows give it a playful finish.
This style works beautifully with pastels, metallics, or even soft ombre bases. I personally think almond nails with bows feel very romantic and delicate—perfect for dates or weddings. They’re feminine, flattering, and totally Pinterest-worthy.
Products you’ll need:
- Almond acrylics or natural shape
- Pale pink polish
- Metallic bow charms
Nail Care Tips:
- Keep tips filed evenly for symmetry.
- Use lightweight bows so they don’t weigh the tips.
- Buff edges to avoid snagging.
15. Stiletto Bow Nails
If drama had a nail shape, it would be stiletto. Stiletto bow nails are edgy, daring, and full of personality. The sharp tips create a bold contrast to the soft, sweet look of bows, which makes the combo stand out even more.
They’re not the most practical, but let’s be honest—these nails are about making a statement. I’d call them the ultimate “look at me” manicure.
Products you’ll need:
- Stiletto acrylics
- High-shine polish (black or pink)
- Glitter bows
Nail Care Tips:
- File carefully—stilettos break easily if uneven.
- Use strong adhesive for bows on pointy tips.
- Keep lengths practical so they’re wearable.
16. Christmas Bow Nails (Red & Green)
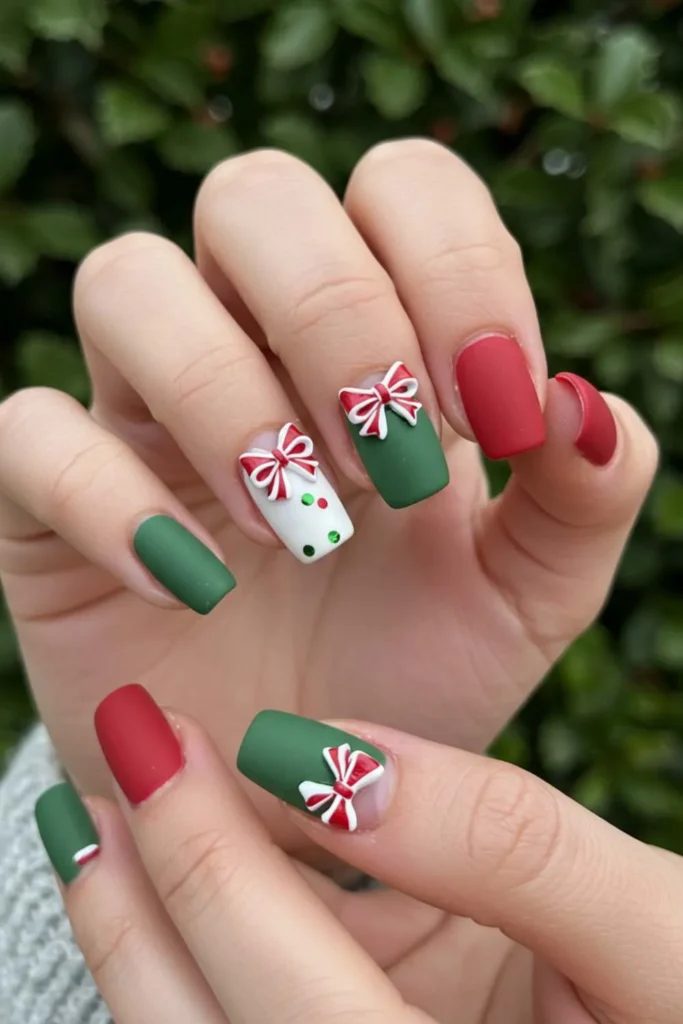
Christmas bow nails are basically little holiday presents on your fingers. Red and green bases topped with cute bows make them festive and fun.
You can even add glitter or snowflake designs for extra cheer. Every time I see these, they remind me of wrapping gifts and sipping hot cocoa. It’s the perfect design to show off at family gatherings or holiday parties.
Products you’ll need:
- Red & green polish set
- Gold glitter polish
- Holiday-themed bow decals
Nail Care Tips:
- Stick with gel polish for holiday longevity.
- Double-seal glitter so it doesn’t shed.
- Use festive accent nails instead of bows on every nail.
17. Valentine’s Bow Nails (Red & Pink)
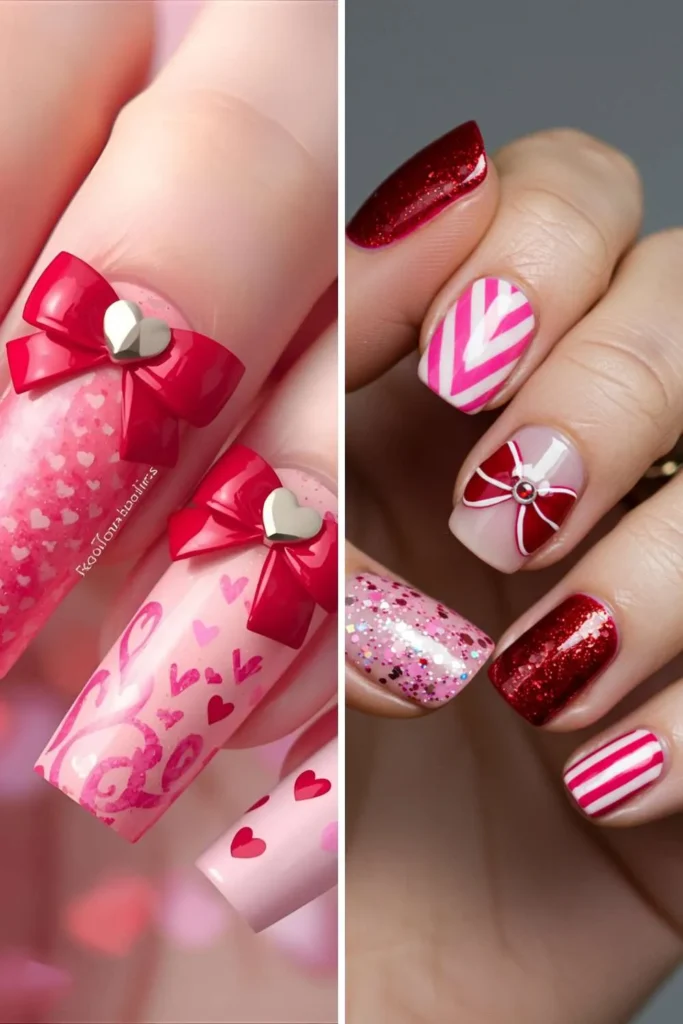
Valentine’s bow nails are sweet, flirty, and full of love. Think pink and red bases with bows as the perfect romantic detail. You can even add tiny hearts or glitter for extra charm.
These nails are ideal for date nights or Galentine’s parties when you want your hands to feel as festive as your outfit. They’re cute, playful, and guaranteed to get compliments.
Products you’ll need:
- Pink and red polish
- Heart + bow stickers
- Glossy gel top coat
Nail Care Tips:
- Stick to romantic shades (pinks, reds, nudes).
- Accent nails work best for hearts + bows.
- Keep them glossy for a romantic vibe.
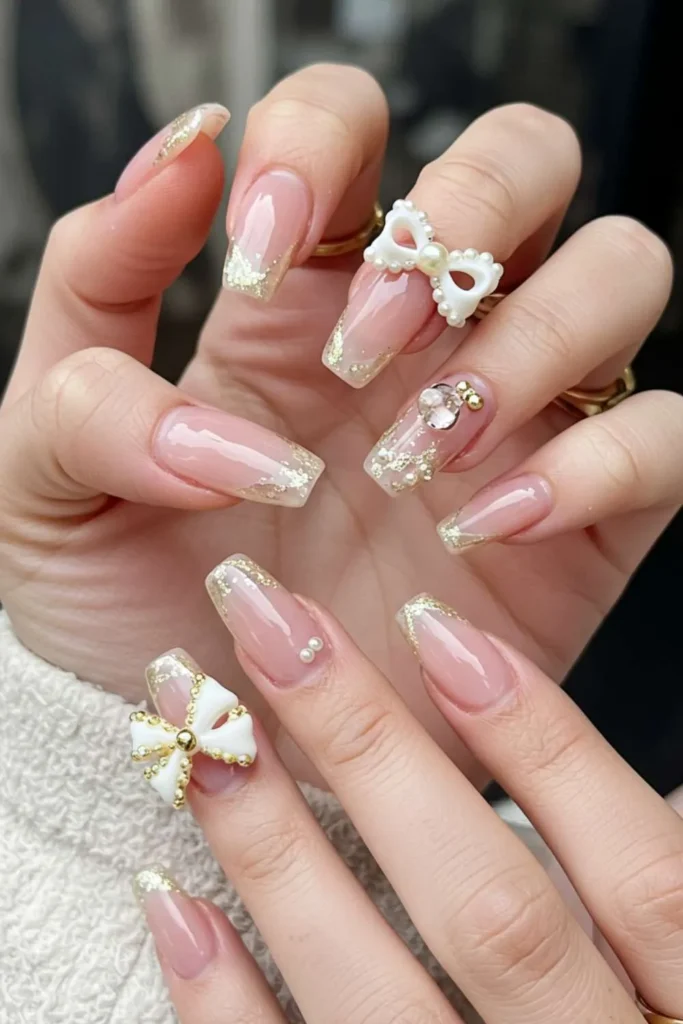
18. Bridal Bow Nail Designs
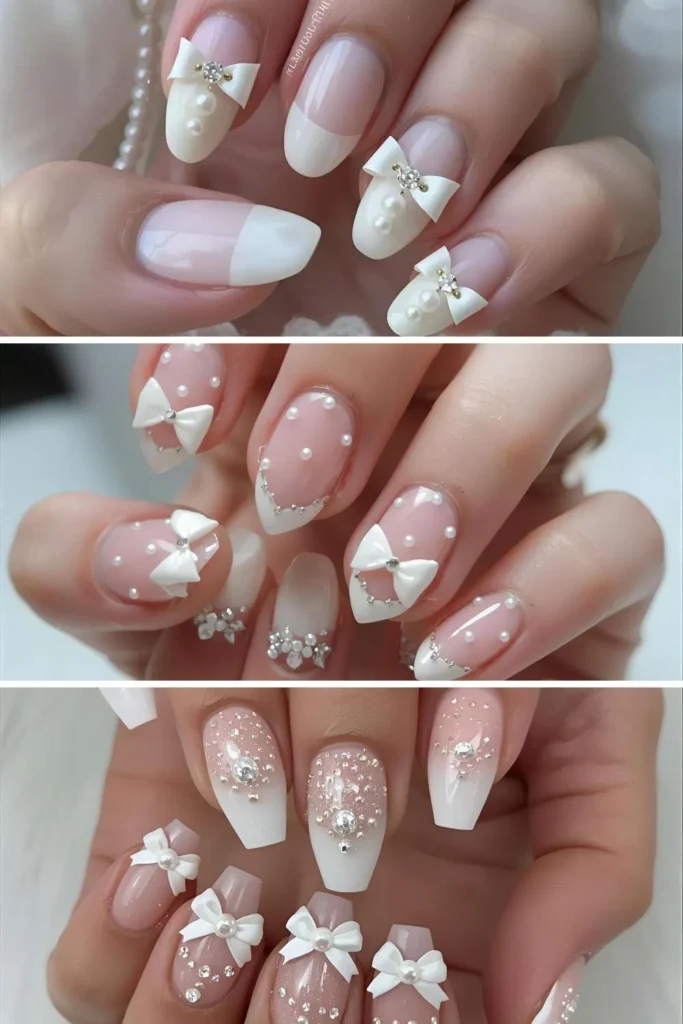
Bridal bow nail designs are made for brides who want that extra dose of charm on their big day. Soft shades like nude, blush pink, or sheer white make the perfect backdrop for delicate bows, keeping the look romantic and timeless.
Some brides go subtle with tiny pearl bows, while others prefer bold 3D accents that stand out in wedding photos. The best part? Bows complement almost any bridal style, whether it’s classic, modern, or fairy-tale chic. They add that little “something special” without stealing attention from the dress or the ring. Honestly, bridal bows are like the finishing touch on your happily-ever-after manicure.
Products you’ll need:
- Sheer white polish
- Pearl bows
- Crystal nail glue
Nail Care Tips:
- Match your bows to your dress details (pearls, lace, crystals).
- Stick to nude bases so bows stand out.
- Do a trial run before the big day.
19. Holiday Party Glitter Bow Nails
Holiday party glitter bow nails are basically little disco balls for your fingertips—festive, sparkly, and impossible to ignore. Think shimmering reds, golds, or silvers topped with chic bow accents that scream celebration. You can go all-out with 3D glitter bows or keep it classy with a glittery base and dainty painted bows.
These nails are the perfect accessory for Christmas dinners, New Year’s Eve countdowns, or any event where you want your hands to shine. Pair them with a sequined dress or even a simple black outfit, and your nails will still steal the spotlight. If you’re aiming for “life of the party” vibes, glitter bows have you covered.
Products You Need:
- Glitter nail polish (gold, silver, or red)
- Nail art bows (3D or stickers)
- Fine detail brush for bow accents
- Strong top coat for extra shine
- Nail glue (if using 3D bows)
Nail Care Tips:
- Always apply a base coat to protect your nails from glitter stains.
- Use a peel-off base coat if you want easier glitter removal later.
- Keep your nails hydrated with cuticle oil—glitter polish can be drying.
- Seal everything with two coats of top coat for a long-lasting, party-proof shine.
- If wearing 3D bows, be mindful while dressing to avoid snagging.
20. Baby Blue Bow Nails
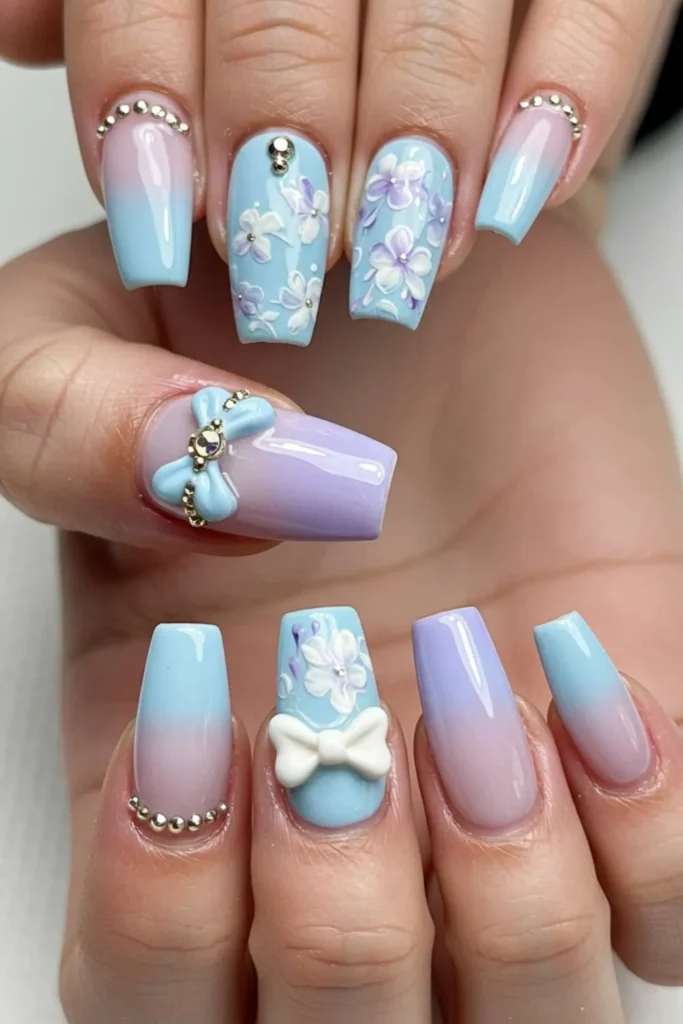
Baby blue bow nails are all about dreamy vibes. They give a soft, pastel touch that feels calm yet super stylish. Adding a bow on top makes them playful and adorable without being too much. Pair them with silver accents or glitter tips for extra charm.
This look is perfect for spring, baby showers, or whenever you want that “cute but classy” energy. It’s like wearing sky-blue ribbons on your fingertips.
Products You Need:
- Baby blue nail polish
- White or silver bow stickers
- Fine glitter polish
- Clear glossy top coat
Nail Care Tips:
- Always buff nails for a smooth finish before applying pastel shades.
- Keep hands moisturized—lighter colors show dryness more.
- Use a thin detail brush if hand-painting bows.
- Seal designs with a thick gel coat to protect the delicate blue.
21. Purple Bow Nail Art
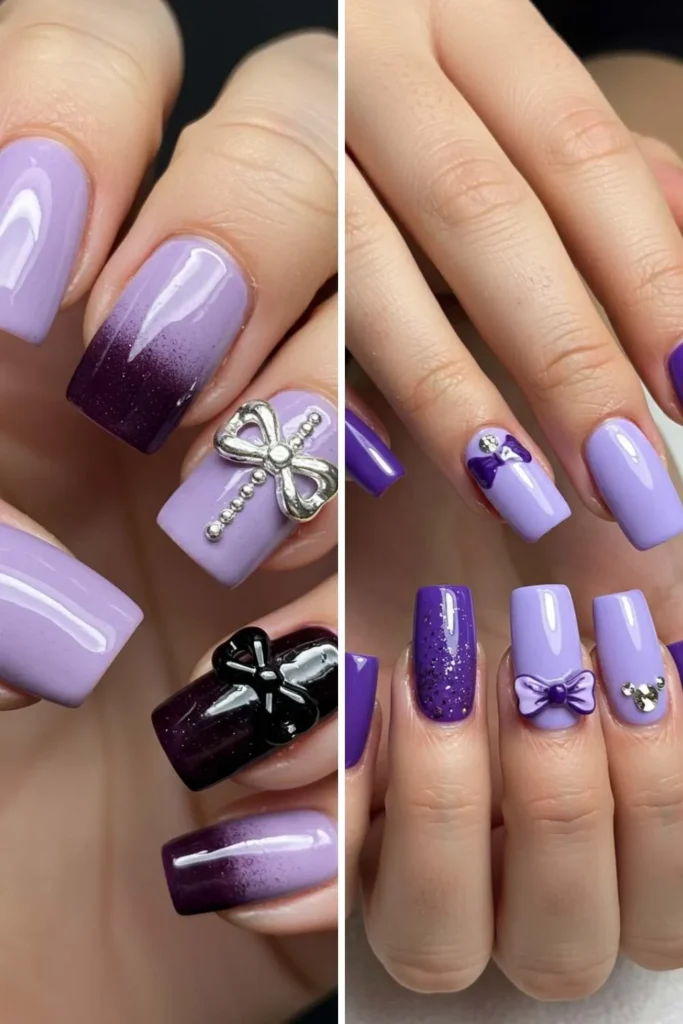
Purple bow nails are for those who like a little mystery with their manicure. From deep royal purple to soft lavender, bows make the shade look playful and chic.
These nails balance elegance with a dash of cuteness, especially if you mix in ombré or glitter tips. Honestly, purple nails with bows feel like something a modern-day fairytale princess would wear. They’re eye-catching without being over the top.
Products You Need:
- Purple nail polish (lavender or deep tones)
- Black or white bow stickers
- Glitter or chrome powder for accent
- Quick-dry top coat
Nail Care Tips:
- Apply base coat to avoid staining from dark purples.
- Hydrate cuticles regularly for a neat finish.
- Use thin layers of polish for smooth coverage.
- Add an accent nail with extra bows for extra flair.
22. Pastel Bow Nails for Spring
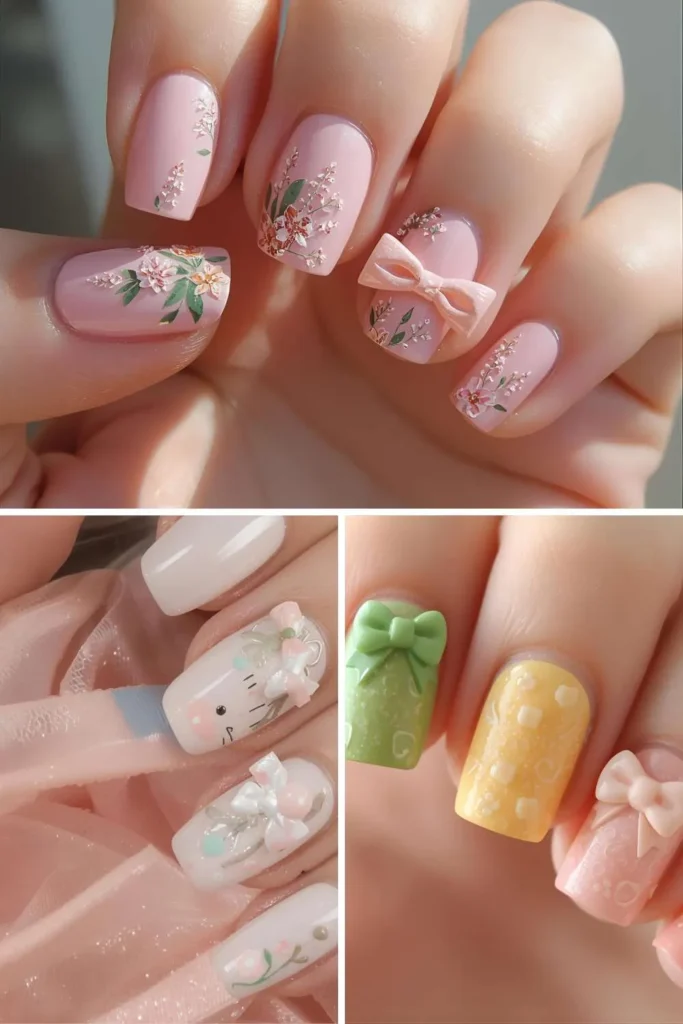
Pastel bow nails scream springtime freshness. Think mint green, peach, lemon, and baby pink bases topped with adorable bows. They’re soft, sweet, and give instant Pinterest “nail inspo with bow” vibes.
Perfect for Easter brunch, picnics, or just brightening up your everyday look. This design feels like painting little ribbons of sunshine and sweetness right onto your nails.
Products You Need:
- Pastel nail polish set (pink, mint, yellow, peach)
- White or multicolor bow stickers
- Dotting tool for small details
- Glossy top coat
Nail Care Tips:
- File nails into a neat oval or almond for a soft spring look.
- Keep hands moisturized—pastels pop against smooth skin.
- Seal delicate designs with two coats of top coat.
- Reapply cuticle oil every night for hydration.
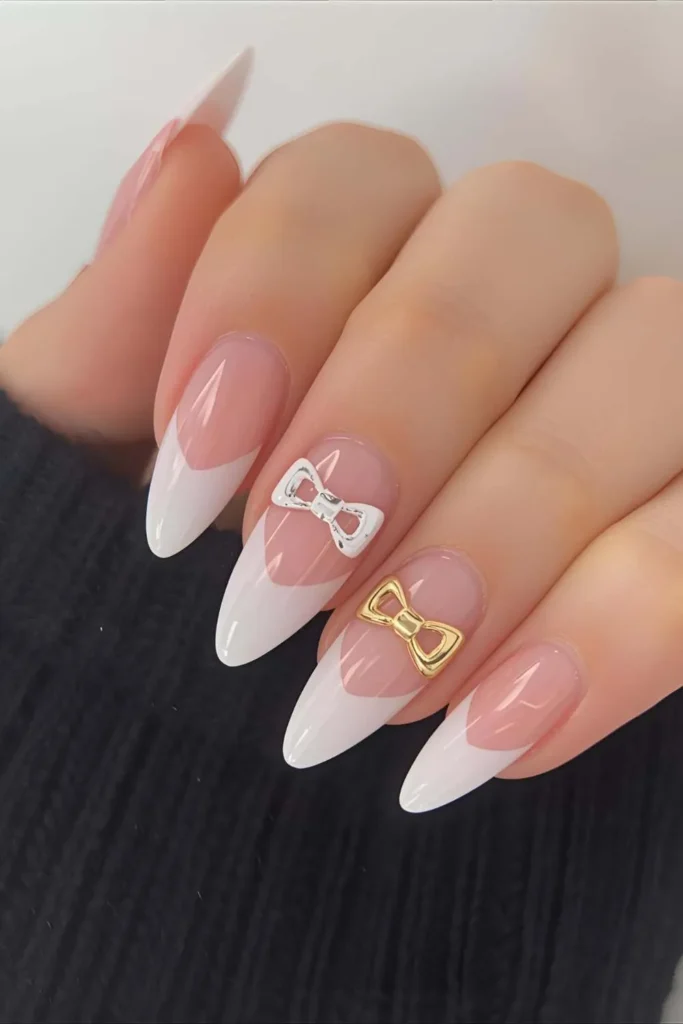
23. Gold Bow Accent Nails

Gold bow nails are pure luxury on fingertips. A simple nude or white base paired with tiny golden bows instantly elevates your manicure. They look festive, stylish, and rich—perfect for weddings, parties, or anytime you want your nails to look like little jewels.
Gold bows work great on accent nails if you don’t want too much shimmer everywhere. They’re classy with just the right amount of sparkle.
Products You Need:
- Nude or white nail polish
- Gold bow charms or stickers
- Gold glitter polish (optional)
- Gel top coat for shine
Nail Care Tips:
- Use tweezers to carefully place metallic bows.
- Apply a thicker top coat so charms don’t snag.
- Keep nails filed evenly—gold stands out more on neat nails.
- Store nail charms properly for reuse.
24. Silver Chrome Bow Nails
Silver chrome bow nails bring that futuristic glam energy. The mirror-like shine of chrome with delicate bows makes nails look modern but still feminine. You can wear them to parties, holidays, or even with everyday outfits for an edgy touch.
Adding bows softens the bold chrome effect, making it less harsh and more playful. Basically, they’re like mixing rockstar vibes with coquette charm.
Products You Need:
- Silver chrome powder or polish
- Bow stickers (black or white for contrast)
- UV lamp (for gel chrome finish)
- No-wipe top coat
Nail Care Tips:
- Chrome looks best on smooth nails—buff well before application.
- Apply thin gel layers to avoid a bulky look.
- Always seal the chrome with a no-wipe top coat.
- Avoid harsh chemicals to keep the shine intact.
25. Jelly Bow Nails (See-Through Look)
Jelly bow nails are playful and trendy with their transparent, candy-like vibe. The bows make them look even cuter, almost like accessories on gummy sweets. Choose pinks, blues, or even neon shades for a fun, summery twist.
They’re lightweight, breathable-looking, and guaranteed to get Pinterest saves. Jelly nails with bows are basically “cute meets cool” in nail form.
Products You Need:
- Jelly-style polish (pink, blue, or neon)
- Small bow charms or stickers
- UV gel top coat
- Nail builder gel (for structure)
Nail Care Tips:
- Keep nails strong with builder gel since jelly polishes are sheer.
- Hydrate hands often so translucent nails look fresh.
- Avoid too many thick layers—transparency should shine through.
- Touch up with top coat every 3–4 days for shine.
26. Ombre Nails with Bows
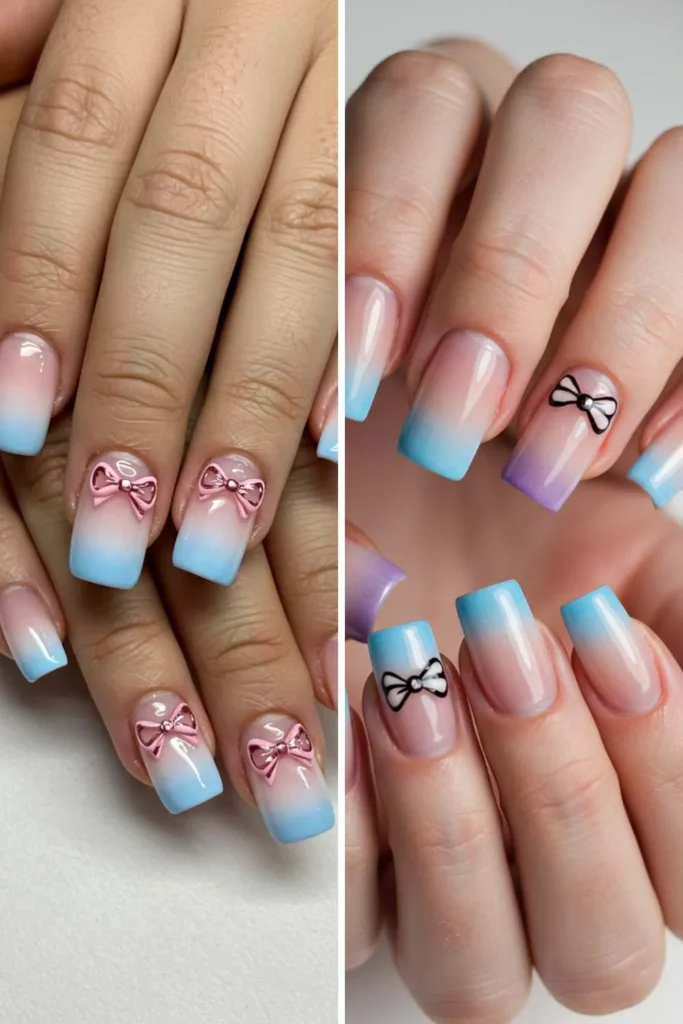
Ombre nails are stunning on their own, but bows take them to the next level. Imagine soft fades from nude to pink or bold blends like blue to purple, topped with tiny bows.
This combo feels artistic yet cute, like the perfect Pinterest “bow nail designs” pin. Ombre adds depth while bows add personality—together, they’re flawless.
Products You Need:
- Ombre sponge kit
- 2–3 complementary polish shades
- Bow stickers or 3D bows
- Fast-drying top coat
Nail Care Tips:
- Practice ombre sponging on a test nail first.
- Apply liquid latex or tape to protect skin during blending.
- Use two thin coats for a smooth ombre effect.
- Lock bows with gel top coat to avoid peeling.
27. Minimalist Tiny Bow Nail Art
Minimalist bow nails are understated but chic. Instead of loud designs, you get soft nude or sheer bases with the tiniest bow accents.
It’s subtle, elegant, and super Pinterest aesthetic for those who love clean girl vibes. Perfect for work, casual days, or when you just want “pretty but low effort” nails. These nails prove that sometimes less really is more.
Products You Need:
- Nude or sheer polish
- Micro bow decals or fine nail art brush
- Matte or glossy top coat
- Nail detailer pen
Nail Care Tips:
- Keep nails filed short for a minimal look.
- Moisturize cuticles to keep the focus on the bows.
- Choose sheer polishes for a clean finish.
- Avoid overloading with too many bows.
28. Cute Cartoon-Inspired Bow Nails
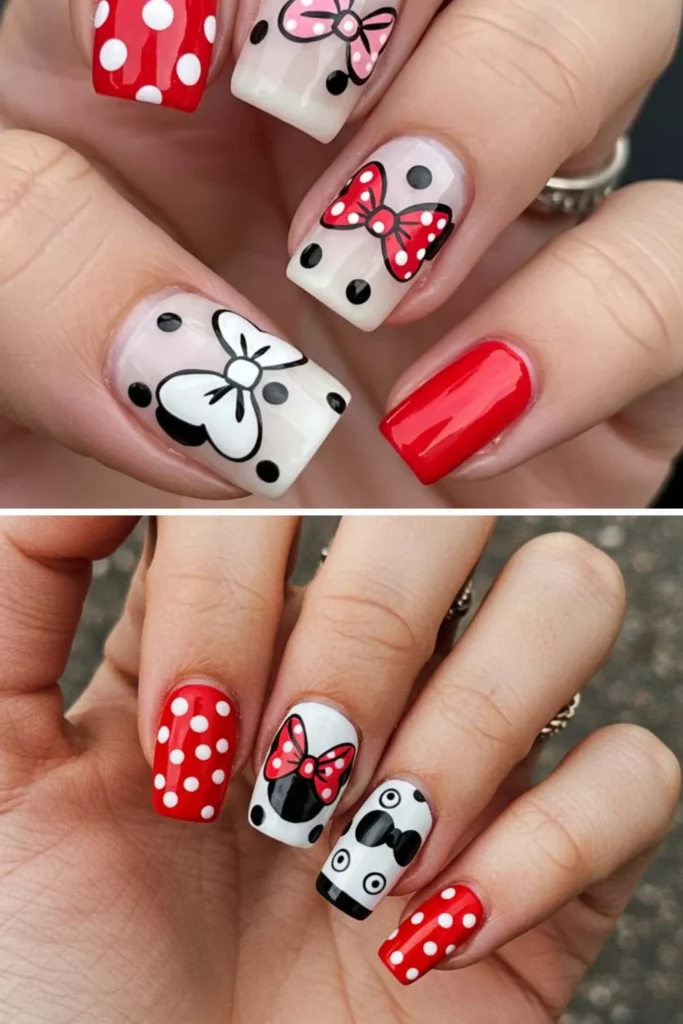
Cartoon bow nails are pure fun! Think Minnie Mouse vibes, bold reds, polka dots, or even playful pastels paired with oversized bows. They’re quirky, nostalgic, and perfect for themed parties or just showing off your playful side.
Honestly, these nails feel like wearing a piece of your childhood—colorful, fun, and totally Pinterest-worthy.
Products You Need:
- Bright red and pastel polishes
- Polka dot nail art tools
- Cartoon-style bow decals
- Glossy top coat
Nail Care Tips:
- Use bold colors for maximum cartoon effect.
- Outline bows with black for definition.
- Keep nail shapes rounded for a fun vibe.
- Seal everything with top coat to last longer.
29. Bow Nails with Pearls
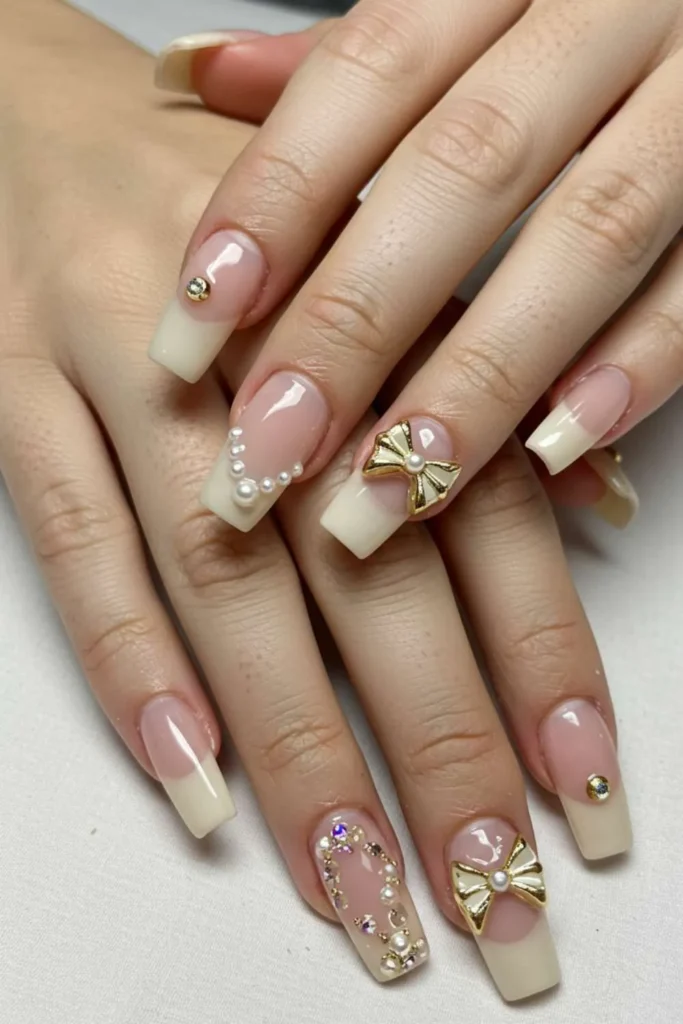
Bows and pearls together? Total coquette-core goals. Pearls add elegance while bows keep things playful—it’s the perfect balance.
This design works beautifully for weddings, anniversaries, or just when you want to feel fancy. They’re sophisticated but still girly, like jewelry for your nails. Expect tons of Pinterest saves with this one.
Products You Need:
- White or nude polish
- Bow charms
- Flatback pearls
- Builder gel for securing pearls
Nail Care Tips:
- Always secure pearls with builder gel, not just top coat.
- Place pearls near cuticle for less snagging.
- Avoid too many pearls—balance is key.
- Reapply top coat every few days.
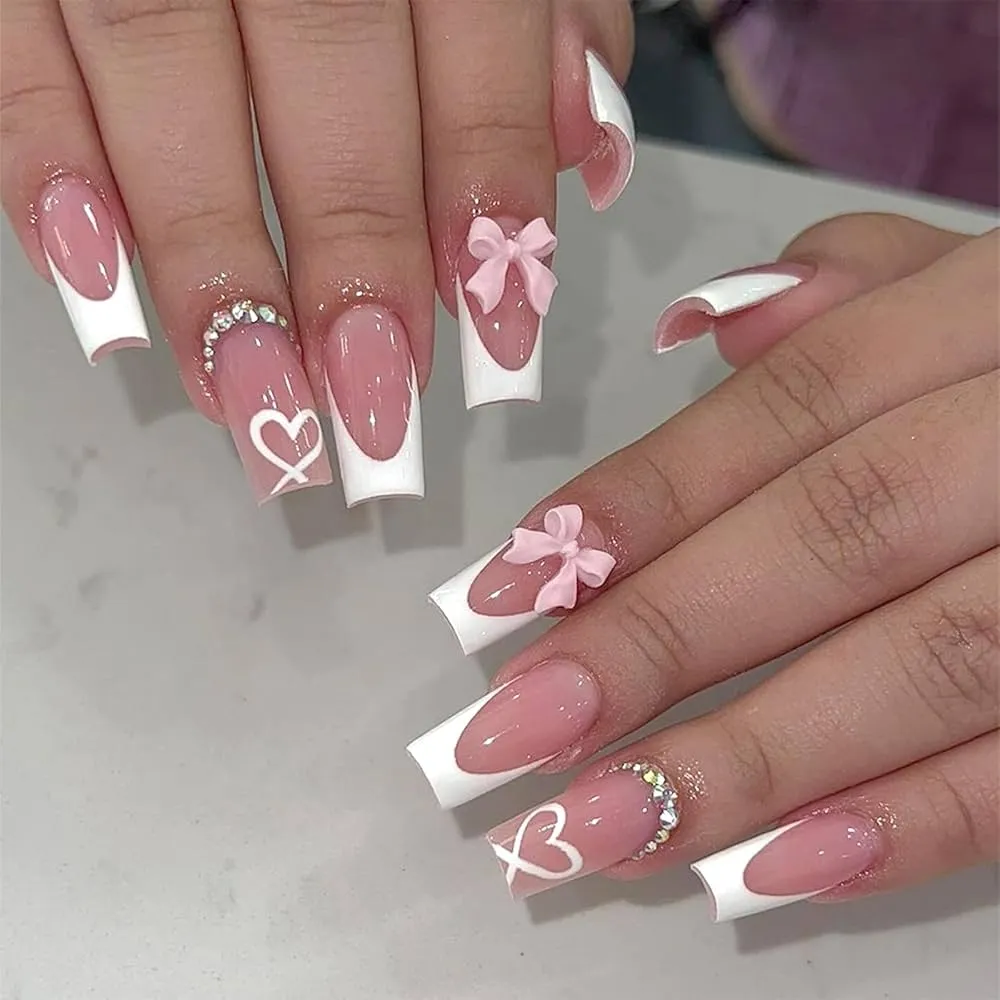
30. Bow Nails with Hearts
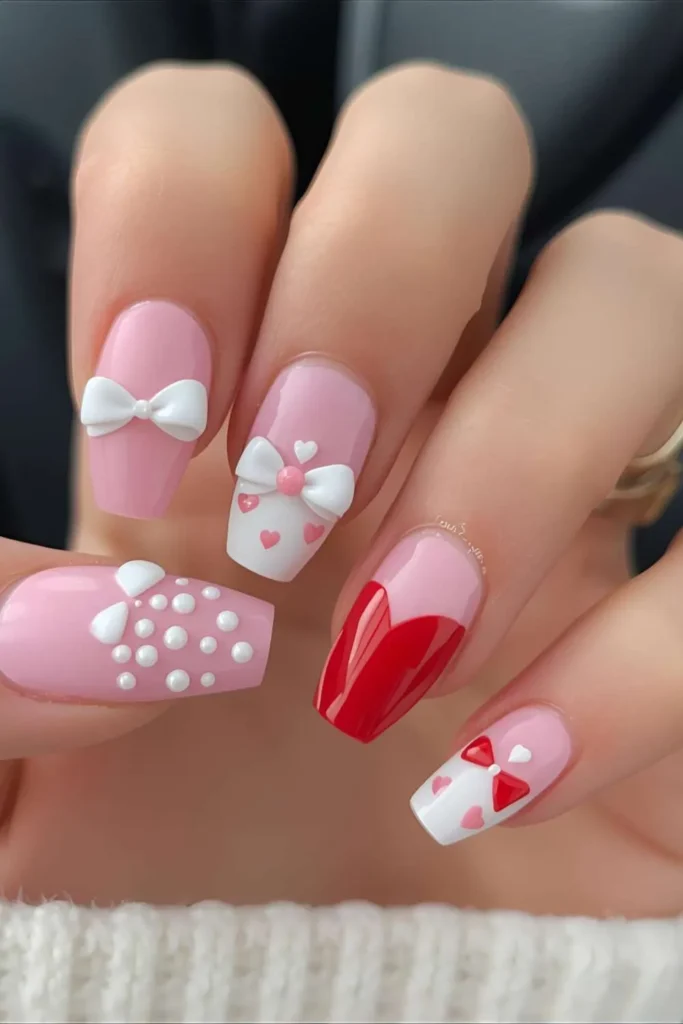
Bow and heart nails are made for romance. Perfect for Valentine’s Day or date nights, they mix soft girly vibes with a touch of love. You can go pink, red, or even pastel bases and top them with dainty bows and little hearts.
The combo screams Pinterest romance aesthetics—it’s like love letters for your nails.
Products You Need:
- Pink or red nail polish
- Heart decals
- Bow stickers or 3D bows
- Glossy finishing top coat
Nail Care Tips:
- Use two coats of polish for a bold color base.
- Keep designs centered for a neat finish.
- Add glitter hearts for extra sparkle.
- Hydrate nails to prevent polish from chipping early.
Conclusion
Bow nails aren’t just a passing Pinterest trend—they’ve officially become a staple in nail inspo boards everywhere. From classic red bows to 3D pearl-studded designs, there’s a bow style for literally every mood, season, and vibe.
Personally, I love how versatile they are—you can go soft and dainty with nudes and pastels, or bold and dramatic with glitter and chrome.
If you’re like me and you can’t scroll Pinterest without hitting “save” on every bow nail pin, then these 30 ideas are your sign to try one.
And remember—great nails don’t just stop at polish; they need care too. So grab your cuticle oil, top coat, and a little patience, because your next set of bow nails is about to steal the show.