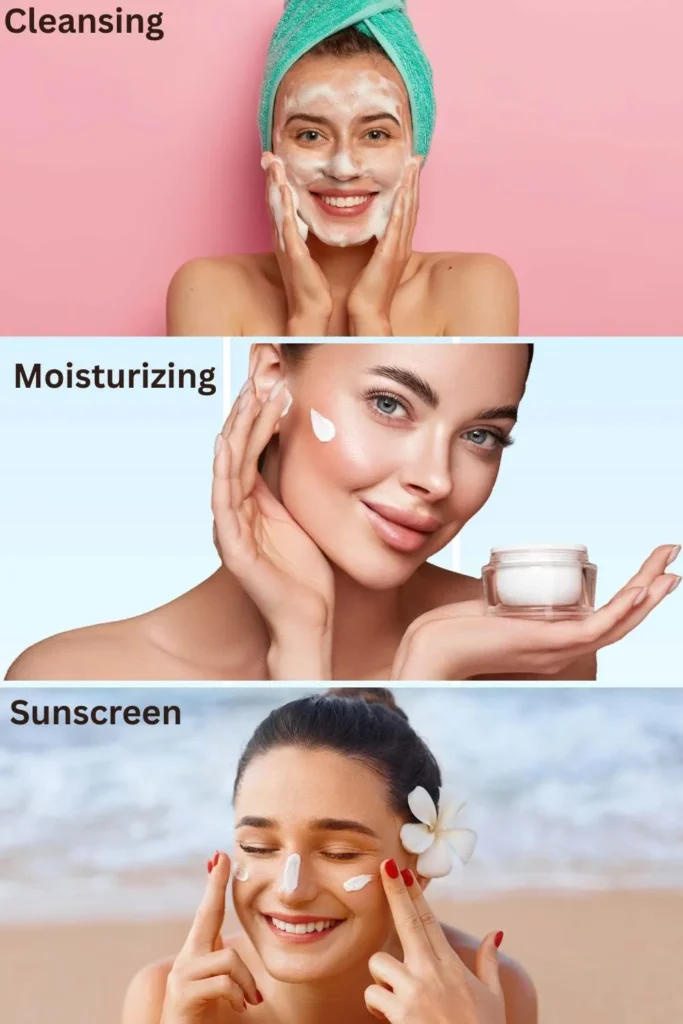
Let’s talk Easy Summer Almond Nails, shall we? Because listen—when the heat’s cranking and we’re living our best sun-drenched lives, our nails deserve a little moment too.
I’ve always been a fan of almond nails. Something about that soft, tapered shape just gets me. It’s chic, it’s versatile, and it’s giving main character energy—especially in the summer.
So if you’re looking for Almond Nail Manicure inspo that pairs perfectly with your beach tote, SPF 50, and iced coffee addiction, girl, you’re in for a treat.
From Short Summer Nails Almond to those extra Almond Acrylic Nails With Flowers, I’ve rounded up 15 ideas that are giving sunshine, fruit bowls, and a whole lotta fab.
1. Watermelon Almond Nails
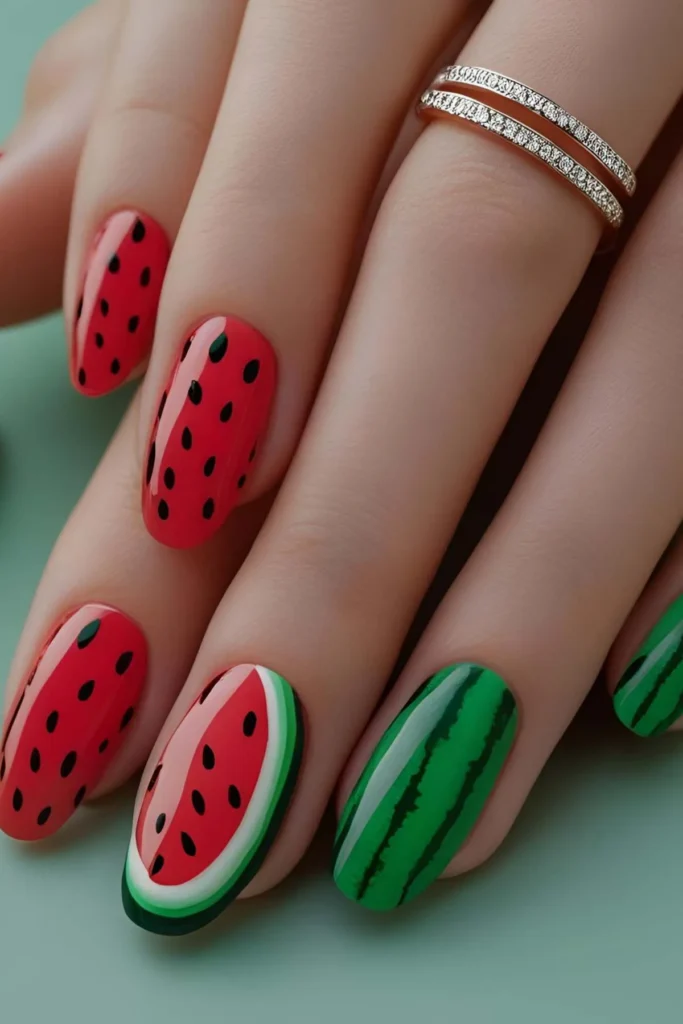
These are the ultimate juicy summer nails. Watermelon almond nails are fun, fruity, and totally give picnic vibes.
The pink and green contrast is eye-catching, and those tiny black “seeds” add just the right amount of detail.
I love how playful this design is without being too over-the-top—it’s cute enough for brunch but bold enough for a beach day.
The almond shape makes it feel sleek, not silly, and it pairs perfectly with a summer dress or denim cutoffs.
Basically, it’s a fruit salad on your fingertips, and I’m obsessed.
Products I Use:
- OPI “Strawberry Margarita” – for that juicy pink base
- Essie “Mint Candy Apple” – the perfect rind green
- Black nail polish + dotting tool – for watermelon seeds
- Clear top coat – to seal the sweetness
How to Care:
- Always apply a base coat to avoid staining your natural nails.
- Let each color layer dry fully before adding details.
- Use a thin nail art brush or toothpick for precise seeds.
- Reapply your top coat every few days to keep it glossy.
- Avoid hot water right after your mani to prevent bubbling.
2. Lemon French Tips
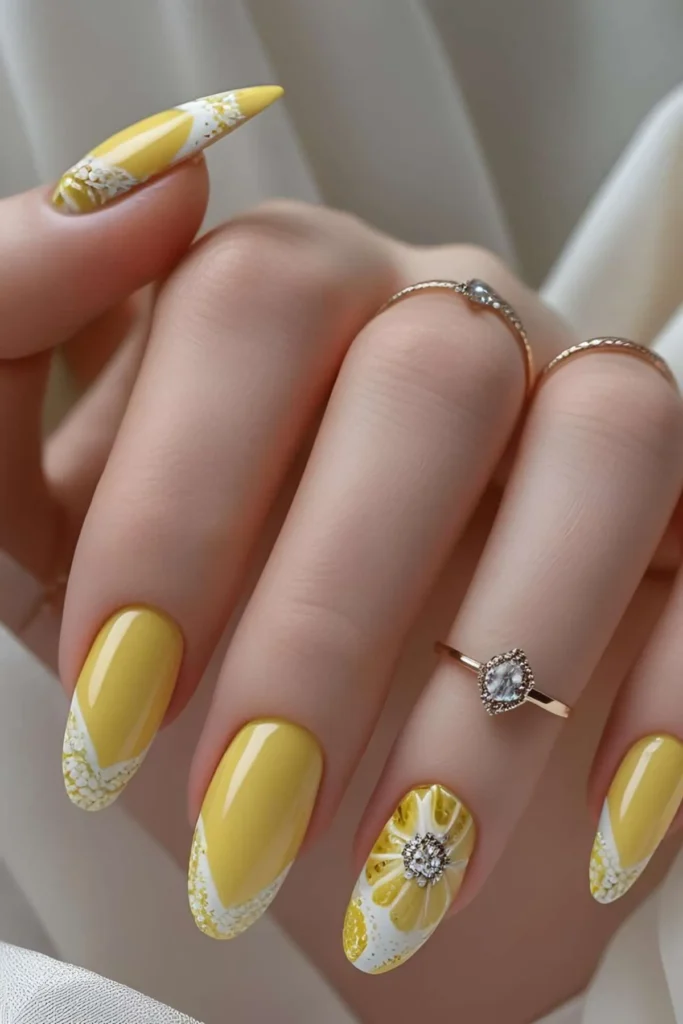
When life gives you lemons… you put them on your nails.
Lemon French tips are a cheerful twist on the classic French manicure.
Instead of white tips, go for a pastel yellow pop—it instantly brightens up your hands and your mood.
The contrast of lemon tips with a nude or sheer pink base feels both modern and fresh.
I wear this one when I want to feel put-together but still summery.
It’s elegant enough for work, but when someone notices the yellow, they always smile—
and I live for those reactions.
Products I Use:
- Essie “Sunny Business” – soft lemon yellow
- OPI “Bubble Bath” – the perfect pinky nude base
- Nail art brush – for precise tip painting
- Seche Vite top coat – to lock it in
How to Care:
- Don’t overload your brush—thin coats make cleaner lines.
- Use nail tape if you need help getting a crisp French tip.
- Apply cuticle oil daily to prevent drying.
- Wear gloves when doing dishes to preserve that bright yellow.
- Refresh with an extra top coat midweek to prevent chips.
3. Ocean Marble Almonds
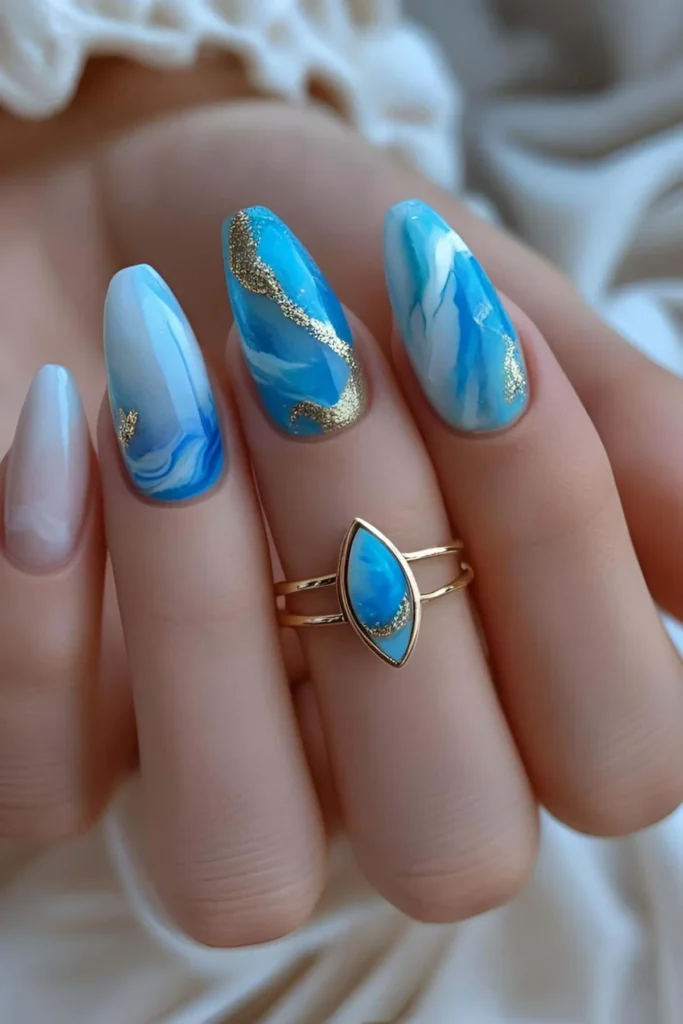
These nails make me feel like I’m on a yacht in the Mediterranean—even if I’m just scrolling on my couch.
Ocean marble nails blend deep sea blues, turquoise, and pearly whites to mimic crashing waves or swirling tides.
The marbled effect gives this look a luxurious, spa-day-at-sea feel.
Plus, no two nails ever look exactly the same, so it’s always unique.
It’s a little more advanced in the DIY department, but trust me—worth it.
Throw on a gold ring or two, and you’ll feel like a goddess of the sea.
Products I Use:
- Sally Hansen “Pacific Blue” – for that deep sea base
- Essie “Blanc” – crisp white for wave accents
- Toothpick or nail art tool – for the swirl technique
- Clear polish – to mix and swirl shades
- High-shine top coat – to finish the look
How to Care:
- Do your swirl design one nail at a time so polish doesn’t dry out.
- Use a small brush to clean up edges before it sets.
- Keep your hands dry for a few hours after applying to avoid smudging.
- Apply a second top coat every couple of days for that wet, ocean-glow look.
- Avoid hand sanitizers with alcohol—they’ll dull the marble effect.
4. Cherry Blossom Nails
Soft, delicate, and downright dreamy—cherry blossom nails are like spring and summer got married and had the cutest mani baby.
These almond nails usually start with a soft pink or nude base and are finished with tiny white flower petals.
Sometimes accented with gold or silver dots.
The florals are subtle but stunning, and the almond shape gives them an elegant feel.
I love wearing this when I want something feminine and pretty without looking too busy.
Pair it with a floral dress or flowy blouse and you’re giving effortless garden goddess vibes.
Products I Use:
- OPI “Mod About You” – the perfect soft pink
- White nail art pen or dotting tool – for the petals
- Gold glitter polish – for accent dots
- Top coat – glossy or matte works
How to Care:
- Let the base dry completely before adding blossoms.
- Use a small brush or dotting tool for precision.
- Apply top coat in two thin layers to seal the design.
- Don’t overload with florals—less is more.
- Avoid peeling edges by moisturizing your nails regularly.
5. Pastel Rainbow Almonds
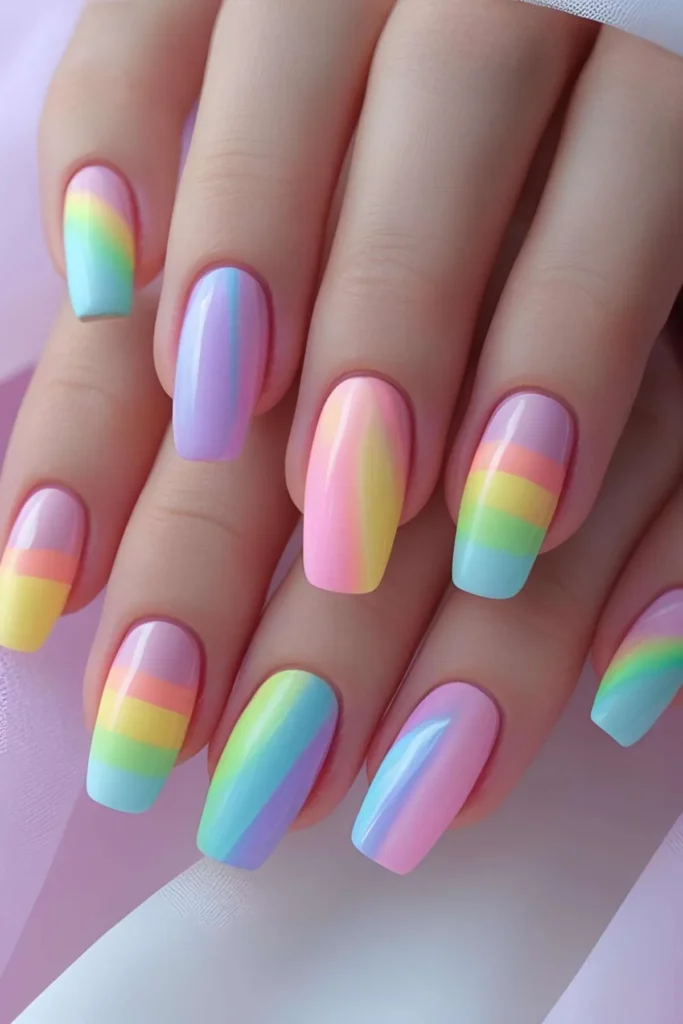
Pastels are basically the unofficial colors of summer, and when you put them all together?
Magic. Each nail gets its own pastel shade—think baby blue, lilac, mint, peach, and lemon.
The almond shape adds a polished edge to what could be a very playful look.
It’s like wearing candy on your fingers, but way more fashionable.
I wear this when I can’t decide on just one color—and the compliments I get are always worth it.
Products I Use:
- Zoya “Abby,” “Jordan,” “Blu,” “Neely,” and “Darcy”
- White base coat (to make pastels pop)
- Gel-effect top coat – for shine and smoothness
How to Care:
- Use a white base to make pastel colors more vibrant.
- Rotate colors between hands for a dynamic effect.
- Keep polish bottles out of sunlight to prevent fading.
- Apply thin coats—pastels can get streaky.
- Don’t skip the top coat—it brings it all together.
6. Nude Nails with Gold Foil
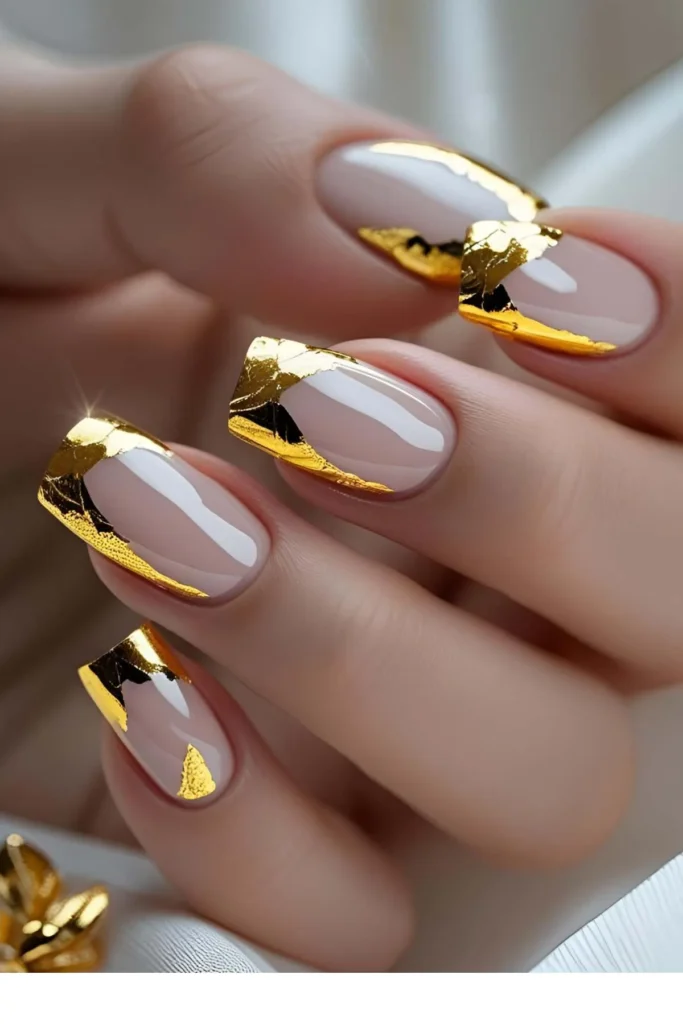
Minimalist glam is a real thing, and this look proves it.
A sheer nude base with scattered gold foil gives your nails a subtle yet eye-catching shimmer.
It’s chic enough for weddings but laid-back enough for everyday wear.
This mani is perfect for someone who loves elegance with just a hint of sparkle.
The almond shape makes the foil placement look intentional and artsy, not messy.
I always get “Where did you get your nails done?”—even when I DIY.
Products I Use:
- Essie “Ballet Slippers” or “Mademoiselle”
- Gold foil flakes – available on Amazon or nail stores
- Tweezers – for precise placement
- Gel top coat – seals in the foil without bubbles
How to Care:
- Apply foil when the polish is slightly tacky, not wet.
- Press gently with tweezers to avoid smudging.
- Avoid alcohol-based sanitizers—they dull the foil.
- Don’t over-layer foil—space it out for a cleaner look.
- Re-top coat every 3 days to lock in that luxe vibe.
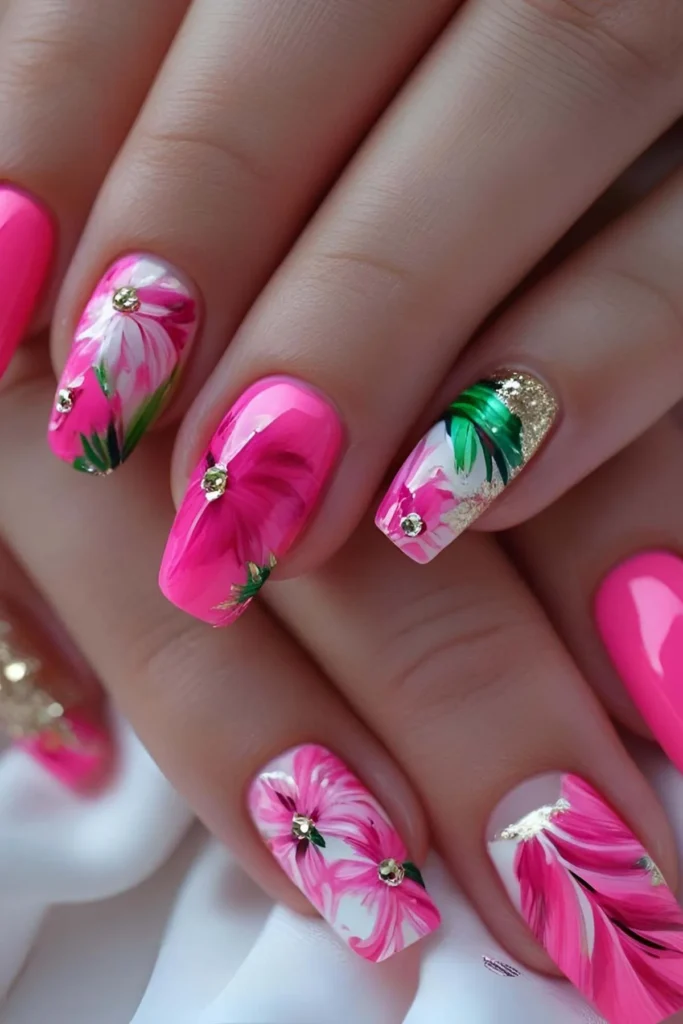
7. Strawberry Shortcake Nails
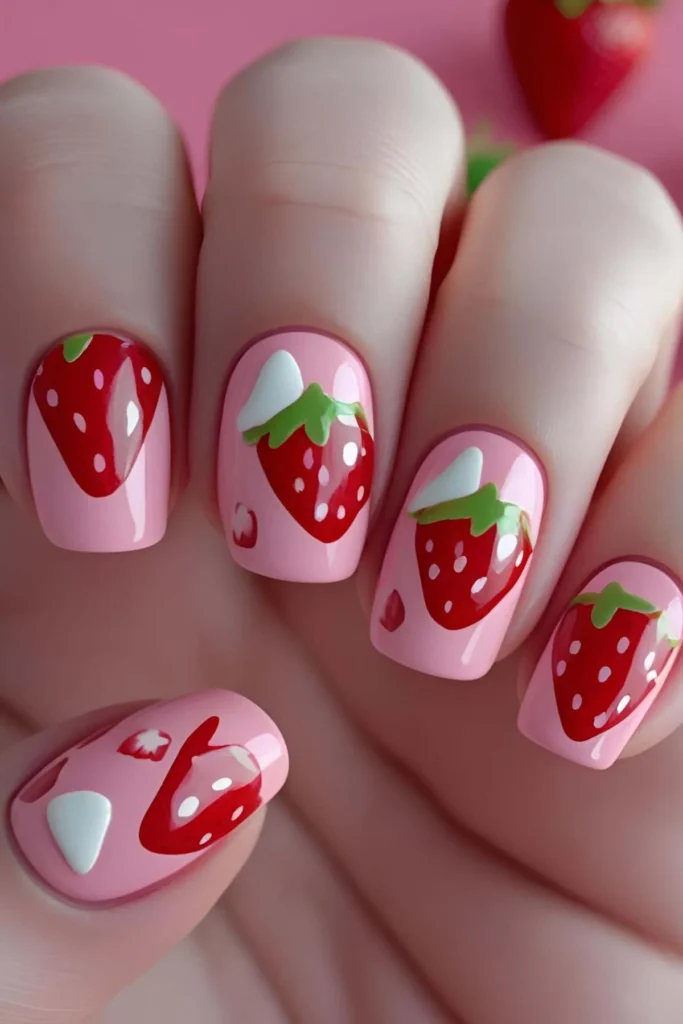
Sweet, fruity, and a little retro—these nails are for the girls who never outgrew their love of cute.
The color combo usually includes light pink, red accents, and adorable strawberry art or decals.
It gives serious dessert vibes (without the sugar crash).
I love using a milky base and keeping the strawberries tiny—it looks clean but still playful.
Great for a summer picnic or a trip to the farmer’s market.
Products I Use:
- ORLY “Sweet Tart” – soft, bright pink
- Green and red polish – for strawberry detailing
- Nail stickers or a nail art brush
- Clear polish to seal in your mini fruit
How to Care:
- Use a dotting tool for tiny strawberry seeds.
- Keep detailing limited to accent nails if you’re short on time.
- Let each layer dry fully to avoid smudging.
- Avoid rough scrubbing when cleaning—strawberry art is delicate.
- Keep your top coat fresh to maintain shine.
8. Sunset Ombre Almonds
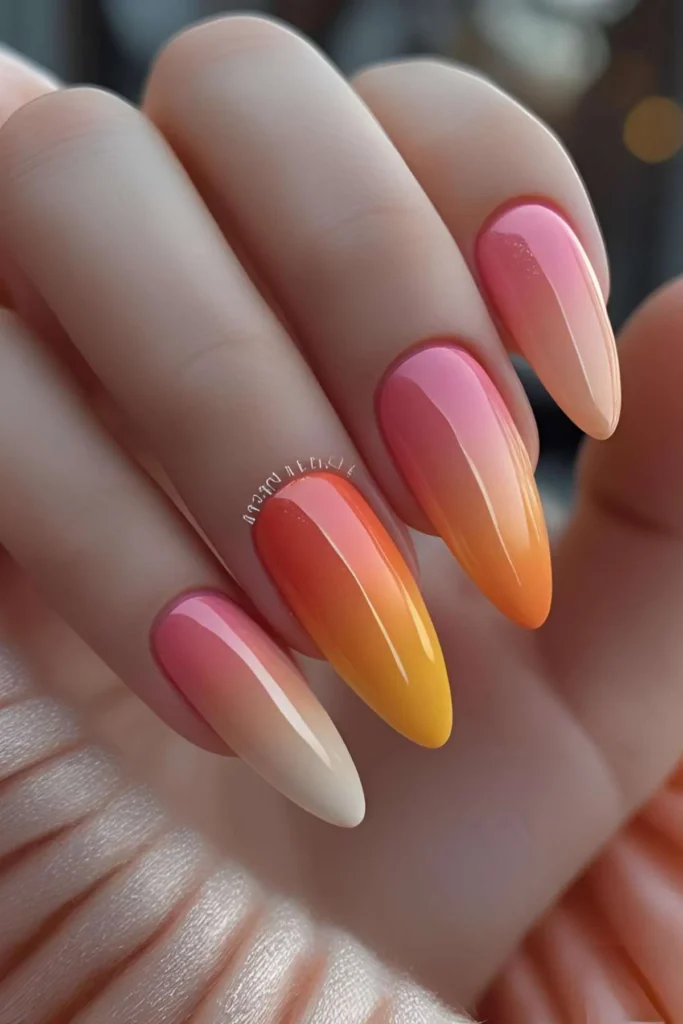
Sunset ombre nails are like wearing a tropical vacation.
They blend orange, pink, and purple in a gradient that looks just like the sky at golden hour.
This style is always a head-turner and feels super artistic.
I love using a sponge for blending—the transition between colors looks so smooth.
Pair these with gold jewelry and you’re giving “goddess on vacay” energy.
Products I Use:
- OPI “Hot & Spicy,” “Big Apple Red,” and “Do You Lilac It?”
- Makeup sponge – for blending ombre
- Latex barrier – for easy cleanup
- Top coat – for a seamless finish
How to Care:
- Use a sponge for a soft fade between colors.
- Apply multiple thin layers—don’t rush it.
- Use a peel-off latex around your nails to avoid mess.
- Let each ombre layer dry before the next blend.
- Re-top coat every 2–3 days for a vibrant finish.
9. Shell-Inspired Neutral Nails

These nails bring calm beach vibes to your everyday.
The soft beige or cream tones mimic natural shells, and a pearly finish adds oceanic shimmer.
This design is subtle but still really special.
I love using tiny shell stickers or a bit of chrome powder to add depth.
If you’re into neutrals but want a summer twist, this look is for you.
It’s clean, versatile, and oh-so classy.
Products I Use:
- Zoya “Chantal” or “Leah”
- Pearl shimmer top coat or chrome powder
- Shell nail decals (optional)
- Tweezers + top coat
How to Care:
- Use a buffer before applying shimmer polish.
- Apply shimmer or chrome in gentle layers.
- Avoid direct heat after application—it can distort shimmer.
- Store shimmer polish away from sunlight.
- Touch up the top coat for extra shine every 2 days.
10. Abstract Neon Swirls
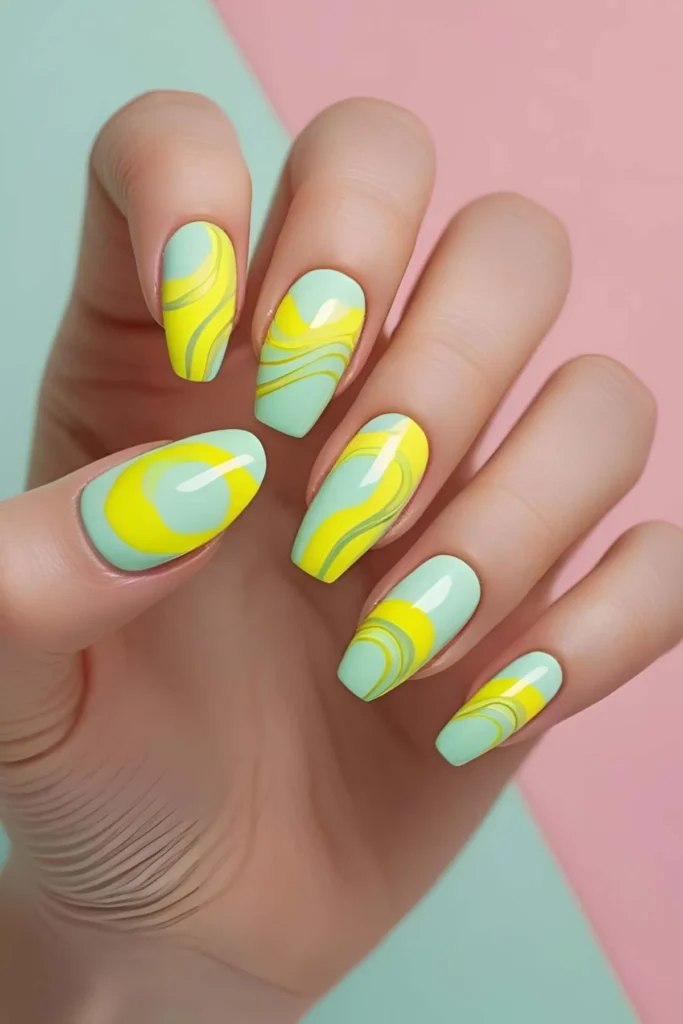
If summer had a rave, this is what it would wear. Neon swirls over a nude base scream cool-girl chic.
The best part? It’s intentionally messy—aka super forgiving.
Go with wavy lines in electric pink, green, orange, and blue.
Each nail gets its own little masterpiece, and the almond shape gives the design a modern finish.
These are perfect for festivals, beach concerts, or just spicing up your mood.
Products I Use:
- Nude base (Essie “Topless & Barefoot”)
- Neon liner polishes in multiple colors
- Nail art brush or liner tool
- Matte or glossy top coat (dealer’s choice)
How to Care:
- Let each neon swirl dry before layering another.
- Keep your design minimal to avoid a cluttered look.
- Top coat is essential—neons fade fast.
- Avoid alcohol-based cleaners—they dull the polish.
- Keep your tools clean for better lines.
11. Icy Blue Chrome Nails
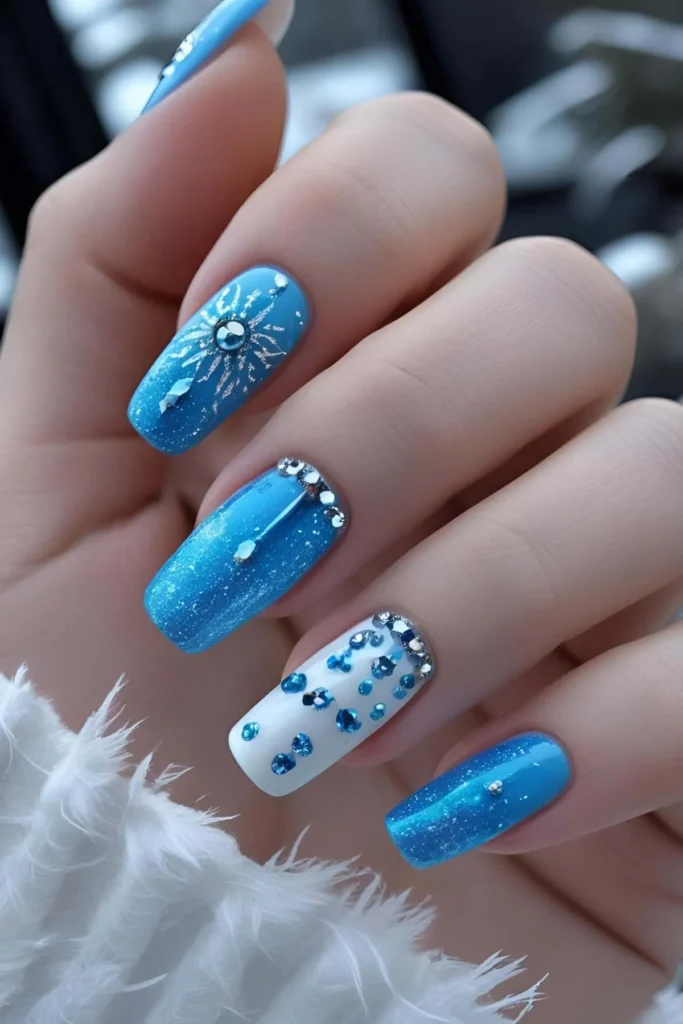
Feeling cool for the summer? Icy blue chrome nails are giving frozen glam in the best way.
The metallic shine reflects light like a disco ball on vacation, and that cool-toned blue screams
“I’m chill but also fabulous.” I love how these almond beauties look ultra-modern without trying too hard.
They pair perfectly with silver jewelry, mirrored sunglasses, and a bit of attitude.
Plus, they’re surprisingly wearable—icy, but not intimidating.
Products I Use:
- Essie “Bikini So Teeny” as base
- Blue chrome powder (rub-on type)
- No-wipe gel top coat
- Nail buffer and applicator sponge
How to Care:
- Buff your nails to perfection—chrome shows every flaw.
- Apply chrome powder on cured gel top coat for max shine.
- Always seal with another top coat to prevent chipping.
- Avoid water exposure for at least an hour post-application.
- Gently clean with a microfiber cloth to keep that chrome glow.
12. Palm Leaf Nail Art
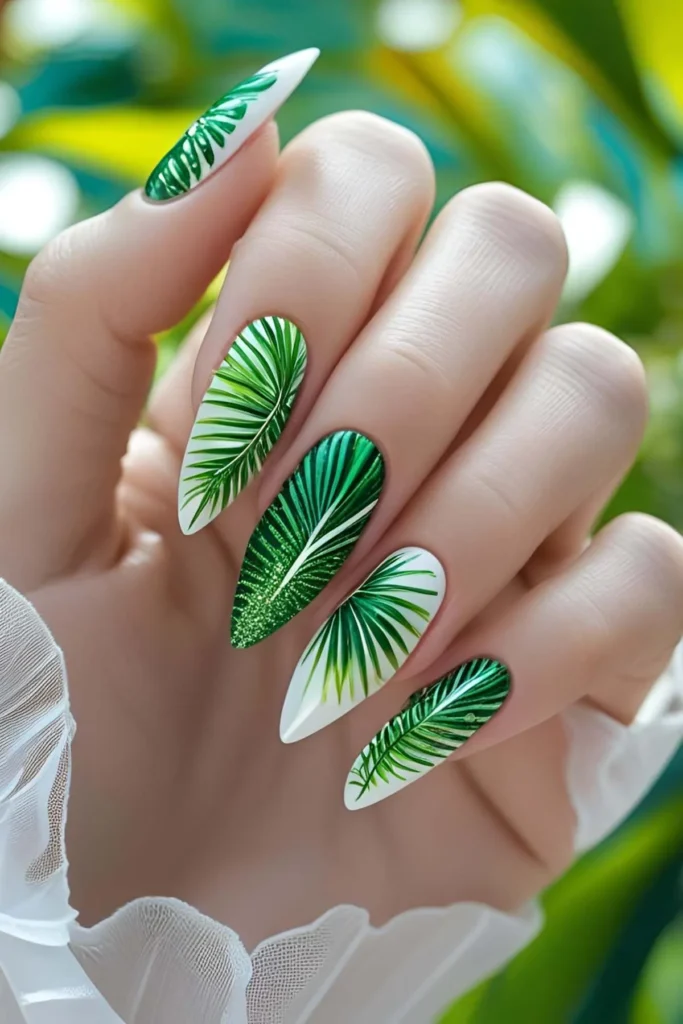
This one’s straight from the Florida nail inspo playbook.
Palm leaf nail art is perfect for that tropical, “just came back from Miami” aesthetic.
I usually start with a white or pale pink base and add in green palm fronds—sometimes just on accent nails to keep it clean.
It’s fresh, fun, and makes me feel like I should be sipping a coconut by the pool.
Plus, it works beautifully with short summer nails almond shape too!
Products I Use:
- OPI “Alpine Snow” for base
- Dark and light green polish or nail art pens
- Palm leaf stencils (if you’re not into freehand)
- Matte top coat for a trendy finish
How to Care:
- Let the base coat dry fully before adding leaves.
- Use a fine liner brush for detailed palm strokes.
- Don’t overload the design—balance is key.
- Top it with matte if you want that editorial feel.
- Keep your nails hydrated with daily cuticle oil.
13. Cloudy Sky Almond Nails
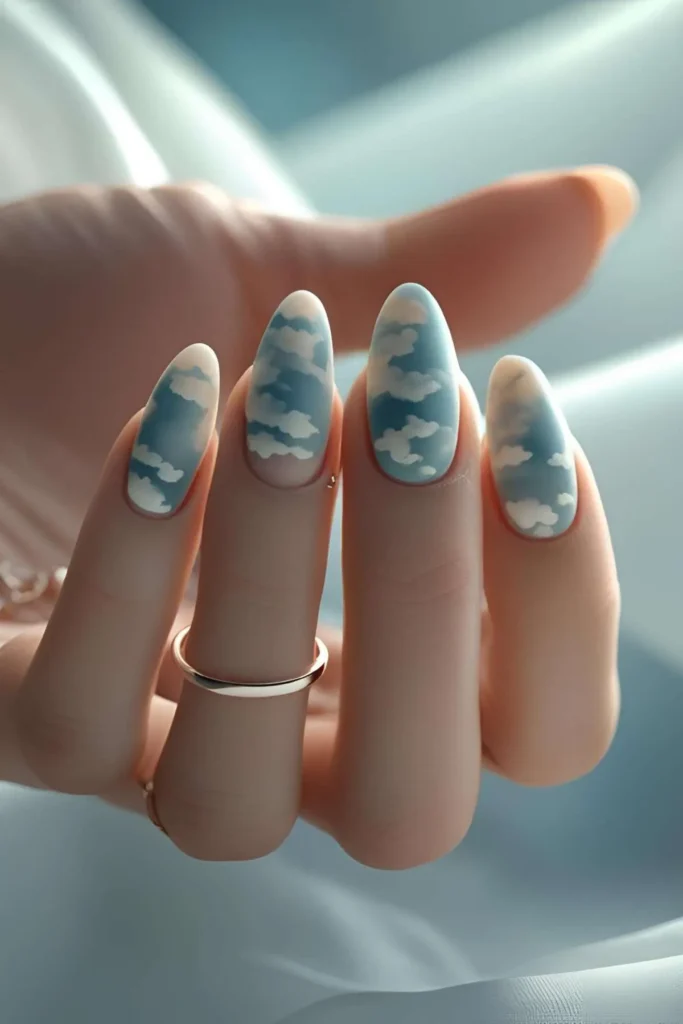
Dreamy doesn’t even begin to cover it.
These soft blue nails with fluffy white clouds make me feel like I’m walking through a fairy tale—
or maybe just scrolling Pinterest on a peaceful Sunday.
The look is whimsical and surprisingly chic.
I use a sponge to dab on soft cloud shapes and it honestly feels like a mini art project.
The almond shape gives it a polished finish that keeps things from looking too cutesy.
Products I Use:
- Essie “Saltwater Happy” or similar baby blue
- White polish for cloud dabs
- Sponge or Q-tip for blending cloud shapes
- Glossy top coat for that just-rained shine
How to Care:
- Use light dabs—don’t smear your clouds.
- Add tiny sparkles or stars for an extra magical touch.
- Avoid over-layering or it’ll look chunky.
- Let dry fully before top coat to prevent smudging.
- Store your nail art sponges in a clean, dry place.
14. Hot Pink Summer Nails
Nothing says “I’m ready to party” like bold hot pink almond nails.
This look is loud, proud, and made for poolside selfies.
I usually go for a high-gloss finish that practically reflects the sun.
Hot pink works with everything—from all-denim outfits to floral maxi dresses.
And the almond shape keeps it looking grown-up, not girlish.
It’s an easy summer almond nails go-to for when I need a confidence boost (or just want to match my favorite lipstick).
Products I Use:
- Essie “Watermelon” or OPI “La Paz-itively Hot”
- High-shine top coat
- Quick-dry drops for speedy manis
- Optional glitter polish for accent nails
How to Care:
- Use a ridge-filling base coat for a smooth finish.
- Keep polish in thin coats to avoid bubbling.
- Wrap the tips with polish to prevent early chipping.
- Avoid hand sanitizer—hot pink can dull fast.
- Moisturize those cuticles like your life depends on it.
15. Peachy Coral Almonds
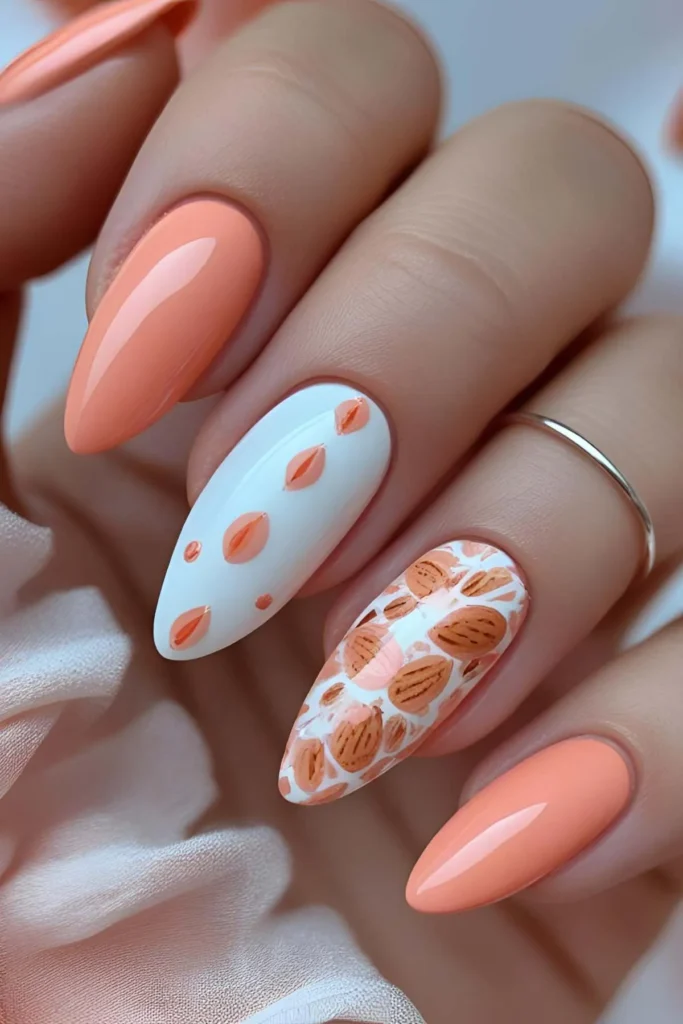
If summer were a color, it’d be peachy coral.
It’s soft enough to feel feminine, but bright enough to pop in the sun.
I love this shade because it flatters literally every skin tone—it’s a crowd-pleaser.
I usually keep it simple: solid color, almond shape, and maybe a little gold stripe or gem on one nail if I’m feeling extra.
This is your “brunch on a rooftop” mani. Effortless, pretty, and very main character energy.
Products I Use:
- Zoya “Sawyer” or Essie “Tart Deco”
- Optional: gold striping tape or nail decals
- Base + top coat combo (I use Seche Vive)
How to Care:
- Always prep nails with a file and buffer for smooth polish.
- Apply two coats for that juicy coral payoff.
- Add nail tape while polish is tacky—not wet.
- Top it off with high-gloss to bring out the warmth.
- Don’t pick at chipped corners—touch it up instead!
Conclusion
So there you have it—15 almond summer nails ideas that’ll keep your hands looking cute all the way through Summer 2025 Nails Almond season.
From fruity fun to ocean glam and everything in between, there’s a style here for every mood, outfit, and vibe.
Just don’t forget to treat your nails like royalty: moisturize, protect, and give them the occasional breather.
Because nails deserve self-care too, right?